
Ultimate Guide to Hip Mobility
This article is designed to be your go-to resource for hip mobility, both in understanding it theoretically and the practical implementation of doing the work or guiding others through the work.
You can learn all you want about the human body, scouring the corners of the internet, but you have to do the work to get change. Knowledge put into consistent practice is power.
In this guide, you will learn:
- The basic anatomy of the hip joint
- The basic anatomy of the lower back
- How the hip and lower back work together to move your leg in space
- What limits hip mobility
- Common methods used to improve hip mobility
- How to perform the most important hip mobility drills
Mobility is a broadly and often misused term.
For most, it means how far you can move a joint or stretch. That sums up how we will use that term in this article more or less.
If you want to get into some finer details of definitions and a bit more abstract, you may enjoy our article on Commonly Misused Words in Movement and Mobility.
This article, however, will focus on the big things you need to understand to work on your hip mobility and be confident in what you are doing.
What Limits Hip Mobility and Range of Motion
Before we discuss the particular ranges of motion the hip joint can access, the relevant anatomy, etc, we need to discuss what can limit the range of motion of a joint.
The body in many ways is like a multiple choice test.
There are only so many things that could be going on; it’s a problem with a limited number of answers.
Let's look at the 'answers' with some examples to the question 'what limits range of motion?'.
The Limitations (in no particular order)
- Swelling/foreign body
- Soft tissue approximation
- Bony limitations
- Non-contractile soft tissue constraints
- Neuromuscular limitations
Not often do you hear conversations in the movement, mobility, and fitness world about the normal limitations of joint range of motion.
It seems at times we think there is infinite range of motion available if we just stretch enough or mobilize hard enough.
That is unrealistic.
Imagine a dog. Don't you think at some point a dog's knee can only bend so far before you start to stress the joint too far?
That is true for humans also.
There is a limit to ranges of motion of joints (and there should be) since they exist as a physical structure in a physical world.
The goal for healthy joints can be simplified as this: full anatomically available range of motion of the joint is accessible and pain free at the end range.
Anatomically accessible range of motion is the range the joint can move in in the absence of neuromuscular limitations or swelling or a foreign body - meaning the anatomically accessible range of motion is limited by passive connective tissue restraints, bony limitations, and soft tissue approximation.
The goal is to have the anatomically accessible range of motion available to you and then build strength, coordination, endurance, etc. within that range of motion.
Create the range and then build things within that range.
Let's continue by looking at each limitation in more depth.
Swelling/Foreign Body
Ouch.
Your knee would have a chunk of bone that could get caught in the joint and limit the range of motion. Or it could swell up and that fluid could limit the range of motion.
That's an example of how swelling or a foreign body could be a limitation to joint range of motion.
Unless you've had a recent injury, this is likely not the cause of your limited joint range of motion.
Soft Tissue Approximation

If you were to bend your elbow into flexion (the motion you would do in a bicep curl or COVID elbow greeting) as far as possible, what would ultimately limit the range of motion? As in, why does the joint not just continue forever in its range of motion?
What limits this range of motion for the vast majority of normal elbows is soft tissue approximation.
Your forearm literally runs into your biceps.
I know some of you reading this have massive biceps and some of you have pencil arms, so the limitation will be different, but think about that for a minute.
The size of your muscle mass can be a limitation to your range of motion in some joints in some ranges.
Do you want to improve your elbow flexion? One method would be to reduce the size of your biceps. Do you want that? I can’t tell you what you want, only you know.
The point is, some joints' range of motion is limited by soft tissue approximation. Stretching won't change that.
Bony Limitations
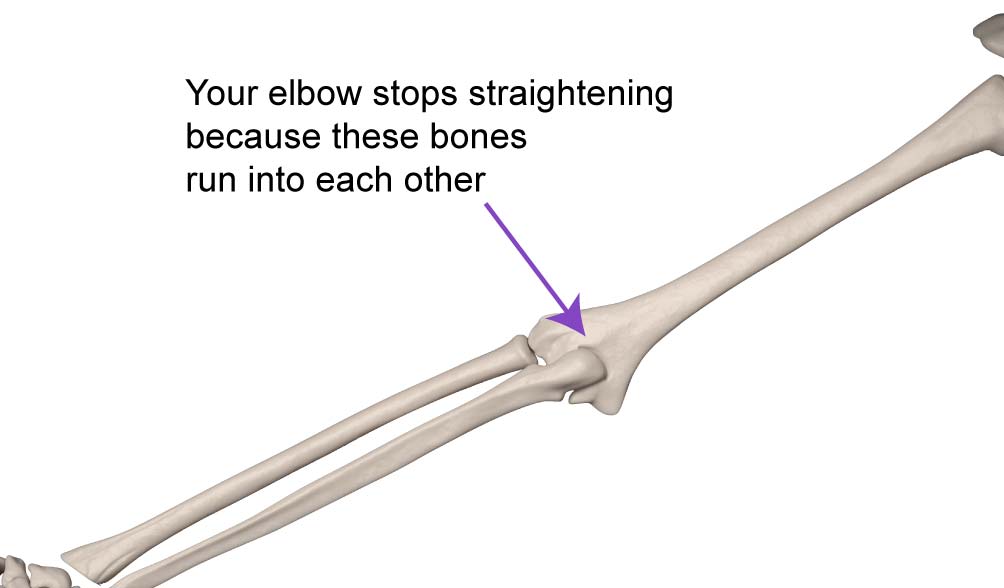
Why does it stop? Why can’t you just keep going?
For the normal elbow, the limitation to elbow extension is a bony limitation. This means two bones run into each other and the contact of those bones prevents more motion.
Can this range of motion be increased? Not without surgery or breaking your arm. I assume you prefer neither of those and can accept your elbow extension range of motion as it has been anatomically gifted to you.
Non-contractile Soft Tissue Constraints
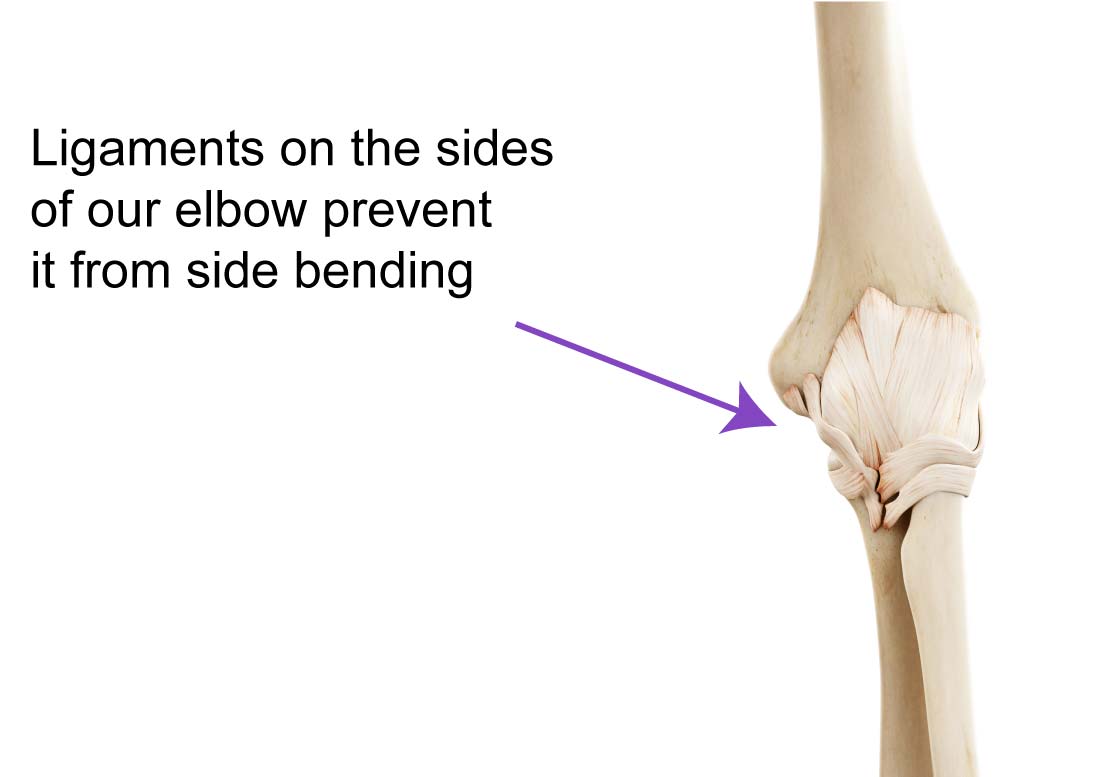
If I grabbed your elbow and tried bend it sideways, what stops the range of motion? Is it a lack of stretching or foam rolling? Is it bone running in to each other?
In this case, let’s call it a non-contractile soft tissue constraint. This is a fancy way of saying that some soft tissue that is not muscle, such as a ligament, limits the range of motion.
In a normal, uninjured elbow, this motion is limited by the ligaments of the elbow.
This is not something you want to change unless you have had a major ligament injury that healed in a particular way that you need to stress it.
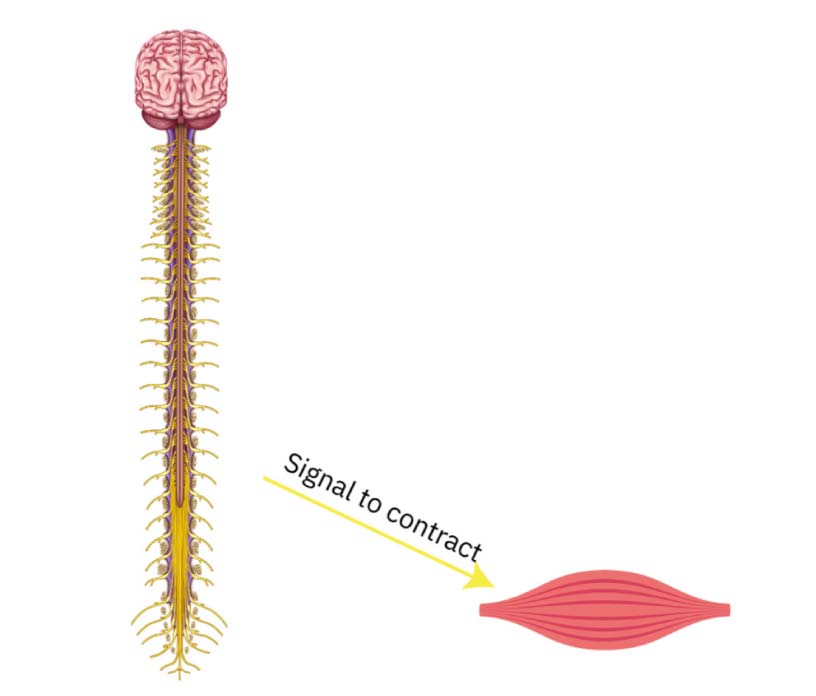
Neuromuscular Limitations
These can occur for a variety of reasons, but essentially they’re caused by the central nervous system regulating the ‘tone’ or level of contraction of a muscle.
Your brain and spinal cord together are called your central nervous system. (CNS) Your CNS is the main target for improving your range of motion in my opinion.
Neuromuscular limitations are unique from the list above because they are the ones we can actively do something about.
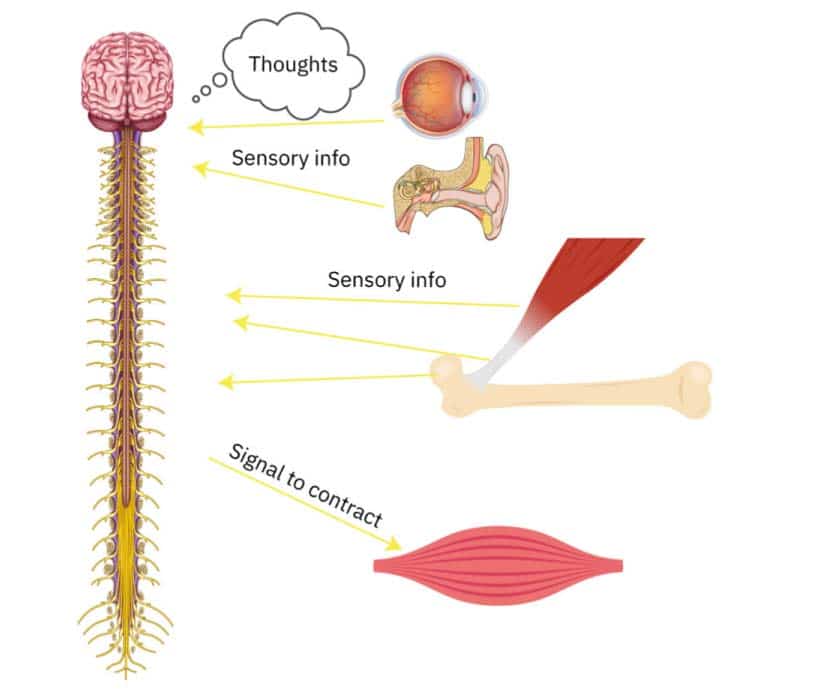
How the Neuromuscular System Works
Muscles cross one or multiple joints by connecting on to the bones.
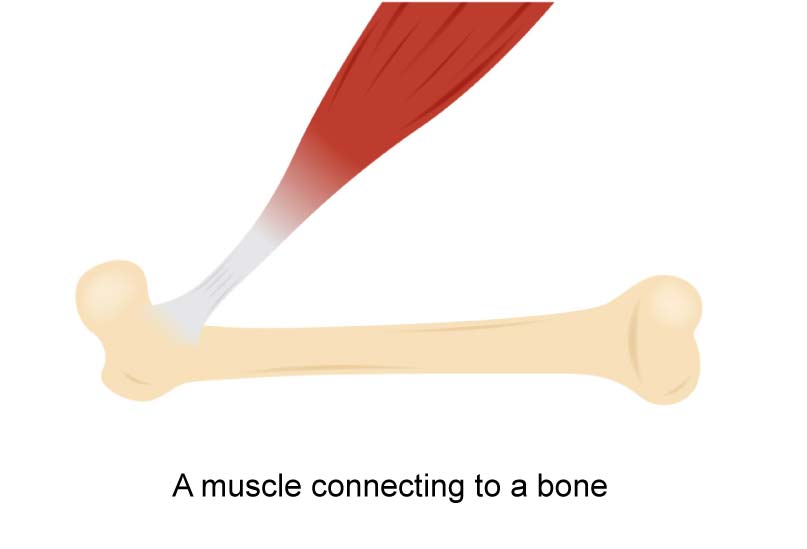
A muscle by itself doesn’t do much. It needs to be told what to do by the nervous system and it can do one thing: contract.
When it contracts, it will pull on the bones and move the joint, prevent the motion of the joint, or slow down the motion of the joint - depending on the level of contraction and loads.
Basically, muscles contract to create, slow down, or prevent motion of the joints.
And this is controlled by the nervous system.
Think of the nervous system as the ultimate control system of your body with a variety of inputs and outputs.
For the movement of your body, the inputs come from sensors in your muscles, ligaments, tendons, joints, conscious thoughts, visual input, unconscious thoughts, inner ear, to name the biggest players.
The ‘goal’ of your nervous system is to keep you safe, alive, and out of harm’s way.
If there are inputs into the system that make it conclude more range of motion is somehow ‘bad’, your nervous system won’t always decrease the output to the muscles that prevent the joint from going farther into a range of motion.
If muscles cannot relax (which is due to output from the nervous system), joint range of motion will be limited.
The nervous system may not let the muscles relax for a number of reasons, but some of them are if your nervous system ‘thinks’ that:
- Tissues are being over-stretched and at risk of being injured
- There isn’t enough support of the joint (strength deficit) to keep it safe in the position you are trying to put it in
- Something being compressed might create pain or injury
- You may lose balance & fall
Additionally, there can be limited range of motion just from not understanding and being aware of how you are moving your body.
If the cause of decreased range of motion is neuromuscular in origin (barring a neuromuscular disease process), repeated and graded exposure to the largest pain-free range of motion of the joints is a powerful tool & the basis of how I approach working on range of motion.
Methods to Increase Mobility
I speak with ‘probably’ and ‘most likely’ because much of this is still theoretical. The body is a complex system of complex systems made of rapidly vibrating particles. We don’t know everything for sure.
The limitations that we can actually affect are:
- Neuromuscular limitations
The limitations we can probably affect but may take a long time (weeks to months to years) to change, and we may not want to change these:
- Non-contractile soft tissue constraints
One thing is for sure: Nothing works for everyone.
People have different tastes, different belief systems, different understandings, and different causes of limited range of motion.
It’s best to choose methods you enjoy doing that you can build in to your daily or weekly routine that you will actually do.
The biggest issue for most people is a lack of execution.
By choosing exercises, movements, or drills that you enjoy, you will have better execution.
Poor execution of great drills is not as effective as great execution of good drills.
Don’t get hung up on fanciness. Get hung up on consistent execution.
The Common Methods for Neuromuscular Limitations
- Foam rolling or external pressure
- Contract and relax
- Sustained holds
- Intentional reps
- Build strength
Foam rolling or external pressure
This is the most passive method with the shortest term change, but often immediate change.
This technique is best used in conjunction with other techniques.
Foam rolling does not change the structure of your tissues.
You do not need research to understand this, just simple logic:
If foam rolling was going to break up scar tissue or adhesions of scar tissue, one would expect your skin to also break. Your skin doesn’t break, so why do you think scar tissue is breaking? It’s a myth.
Instead, the mechanisms are more likely:
- Reflexive relaxation of the muscles from the compressive pressure
- Creating friction, which creates warmth, which makes tissues more malleable
- Mechanically pushing fluid around
I recommend most people spend less than 30 seconds foam rolling a particular area before moving on to a range of motion drill.
The changes from foam rolling are short lived, lasting minutes to hours.
Permanent change is not created from foam rolling.
Think of it as a window of opportunity to decrease stiffness to then actively move your body through an easier range of motion with less internal resistance.
Foam rolling or tissue work does not need to be painful to be effective. In fact, if it is non-painful, you are able to relax more, which will decrease the muscular stiffness.
Contract and Relax
In this method, the idea is to go into a slight stretch of whatever range of motion you are working on, then once in that position, contract the muscles you are stretching from 10% to 80% of your ability (the numbers vary based on ‘technique’) hold for 5-20 seconds (the holding time varies by technique) then relax and go a little deeper into the stretch.
There are a variety of techniques built around the idea of contract and relax.
For that reason, there are many recommendations you will find: Contract this hard, hold for this long, etc.
This makes it confusing because how are you supposed to know what to do?
My suggestion is to contract about 25% of your strength, hold for 10 seconds, relax into the stretch a bit farther for 10 seconds, contract 25% and hold for 10 seconds, and repeat for about 5 cycles.
There is never a perfect prescription for this. A lot of it is feel based. That is the ambiguous truth.
The takeaway is to do a method of contract and relax that feels best for your body and makes a short term change in your range of motion. You need to play around with different intensities of contraction, time of holding, and rounds. That is part of learning what works for your body.
Why does contract relax work?
This technique is neurological in its effects - it’s an attempt to get the nervous system to allow the muscle in question to get to a longer length.
By taking the muscle to a slight stretch, you will stimulate certain nerve endings called Golgi tendon organs, or GTOs. When these are stretched, they send a signal to the brain.
The theory is that by contracting the muscle when it’s at a longer length, you can essentially ‘tune’ the nervous system to permit more range of motion by ‘showing’ the nervous system you have the ability to control that position via the muscle contraction, the nervous system thinks it is ‘safe’ and then allows more relaxation of the muscle to get into a potentially more vulnerable joint position.
The nervous system is designed to help you survive. Part of surviving is not injuring your body. When muscles relax, it opens the door for the joint to be stressed in a way that can cause injury and the nervous system behaves in a way to try and prevent that.
By using our conscious minds and the knowledge we have of the human body, we can ‘trick the system’ and then lock in the changes permanently.
Permanent change is built with consistency of a movement and strength practice over time.
Sustained Holds
This can be thought of as ‘static stretching’.
What a mixed and confusing topic static stretching has become.
There are 1 or 2 studies that show static stretching before a max effort jump decreased performance. From this study, many conclusions have been made that static stretching is not helpful.
There will always be studies showing positive and negative results. Humans are multivariate and complex, which makes it hard to study, especially movement.
Taking a drug, for example, is easier to test. It is all an unconscious process. Movement is a conscious process and that leads to people using their bodies in different ways, which means outcomes are different for different people with the same intervention since you have the ‘black box of consciousness’ greatly affecting results.
Sustained holds work similarly to contract relax in that they are working on the nervous system with the goal to decrease muscle tone to allow the muscle to lengthen, thus moving the joint farther into its available range of motion.
When you stretch, you are activating nerve endings that signal to the nervous system that there is a stretch happening, which creates a feeling of ‘stretch’ in your mind, and your nervous system wants to keep tone in the muscle to prevent injury.
In sustained holds, to improve range of motion, you need to out-endure the nervous system until it ‘lets go’ and you can get farther into the stretch.
You can also try to consciously feel yourself relax into the stretch and mentally attempt to ‘turn off’ the stretch feeling. This is mind-body mastery.
Doing this over and over and over again can lead to decreased sensitivity and reflexivity of the nervous system and allow you to have more accessible range of motion on demand.
Static stretching, however, is not my preferred method of improving range of motion.
I prefer repetitive movements versus sustained holding to create change in movement.
However, there is a time and a place for everything and many people have had great results with static stretching that are lasting, part of their routine, and make them feel better - who am I to argue with someone else’s results?
To achieve the ‘down-tuning’ of the nervous system from static stretching requires patience, calmness, and the right intent.
The intent is not to push as hard as you can into the stretch. The intent is to feel the stretching sensation and relax into it. If you push harder into it, you will just active more of a stretch reflex, which contracts the muscle instead of relaxing the muscle.
Working with the body is a dance.
Intentional Reps
This last category I call ‘intentional reps’.
This technique can be done loaded or unloaded, depending on the tension you want in the tissue. If you are new to movement, stretching, and strength, I would do these unloaded.
The idea is this: get yourself into a position where you can stretch your hip into the direction you are trying to improve.
With control, push farther into the movement to find the stretch feeling, feel the stretch, enjoy the stretch, and return to the start position. Do this again and again for reps, with about a 1 second hold in the stretch, and repeat for 10-20 reps.
Think of each rep as 'exposing' your body to the stimulus of stretch and demanding of it over and over and over again to allow more range of motion.
But this demand isn’t fierce. It is a patient and calm demand.
I have a conversation like this, ‘Hey body, I am going into this stretch because I want you to desensitize to this stretch, so here I go. Ok now I want to show you the stretch again. And again. And again.’
Your body will become used to it, desensitize, and ultimately allow more range of motion of the joint.
Build Strength
The nervous system wants to protect your body for survival.
If you have weak muscles, you may have limited range of motion.
Every muscle in your body has nerves that go into it and power it by giving a signal to contract.
If a muscle is weak, you may have a hard time decreasing the signal to the muscle because there isn’t a safe feeling when the muscle is stretched due to your mind’s assumption of it’s strength and ability to keep structural integrity.
By building strength, you show your body that joints have support, they can be controlled, and holding unnecessary muscular tension is unnecessary.
Building strength intelligently, without stressing the joints in a way that could have negative effects on your longevity, is the ultimate way to ‘lock in’ better range of motion.
Often people think of building strength as making you stiff. When a muscle gets larger, it adds protein. Added protein can make the muscle inherently stiffer.
This inherent stiffness by adding protein is likely offset by the nervous system’s change in this ‘safety sensing’ due to the strength gains (my opinion).
With that said, if you build a lot of muscle using hypertrophy or bodybuilding techniques that keep you in a small range of motion and you don’t stretch, it is possible you will become stiffer due to decreased exposure to the ‘stretched position’ of the joints.
Summary of Methods
This may seem confusing or perhaps overwhelming. There is so much information, so many things you could do, so much uncertainty.
That is the nature of working with the human body. There is ambiguity.
The human body is a neuromuscular system operating in the confines of a skeletal system.
Keep your focus on the nervous system and how you can affect it with the above methods. Don’t stretch into pinching feelings. Don’t be focused on the muscle alone, it acts in concert with the neurological system.
Use the drills at the end of this article as taught in the videos as a starting point.
Anatomy
- The relevant bony anatomy
- How the lumbar spine affects hip joint position
- The relevant muscular anatomy
- A lumbar vertebra
- The Sacrum
- The Pelvis
- The Femur
Bony Anatomy
Lumbar Vertebra
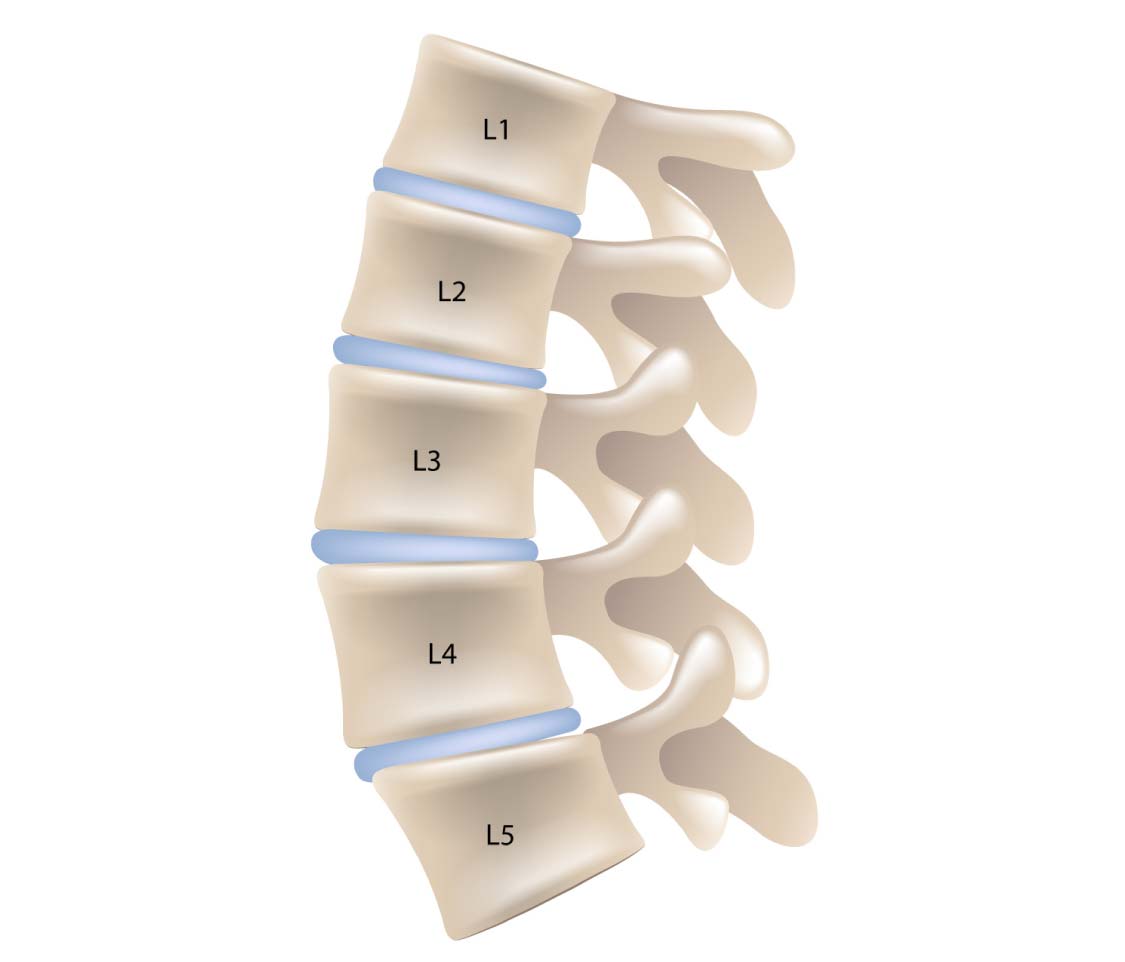
The bones of your spine are called vertebrae (plural) or vertebra (singular).
Your spinal column is composed of 7 cervical vertebrae, 12 thoracic vertebrae, and 5 lumbar vertebrae.
The lowest 5 vertebrae of the spine are the lumbar spine.
Here is what a lumbar vertebra looks like:

Here is a picture of the lumbar spine with all 5 vertebrae included:
Layered on the back of your lumbar spine
are many muscles that help to coordinate movements and send sensory information in to the nervous system (more info on the muscular anatomy later).
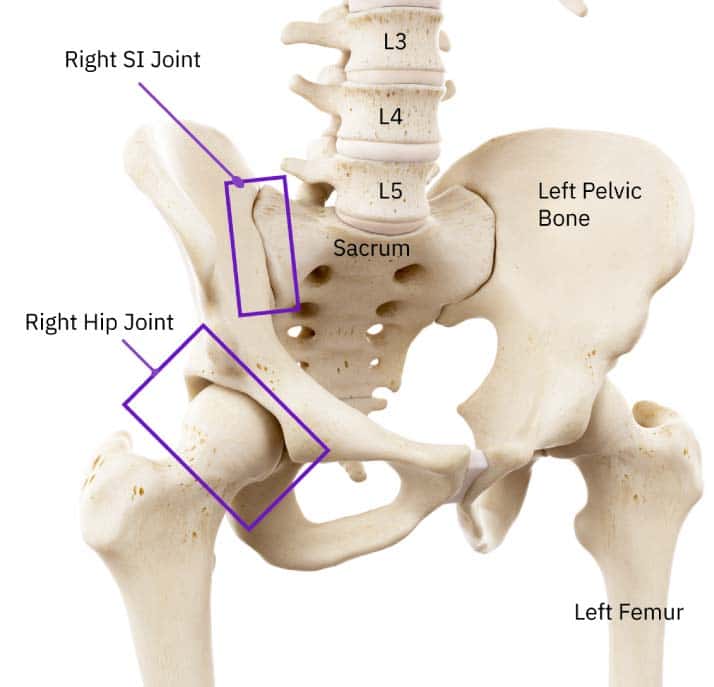
Sacrum
The lowest bone of your lumbar spine, L5, articulates with (meaning it forms a joint or joints with) the second bone we need to cover, your sacrum.
This joint is called the L5-S1 joint. Think of it as being similar to the other lumbar joints.
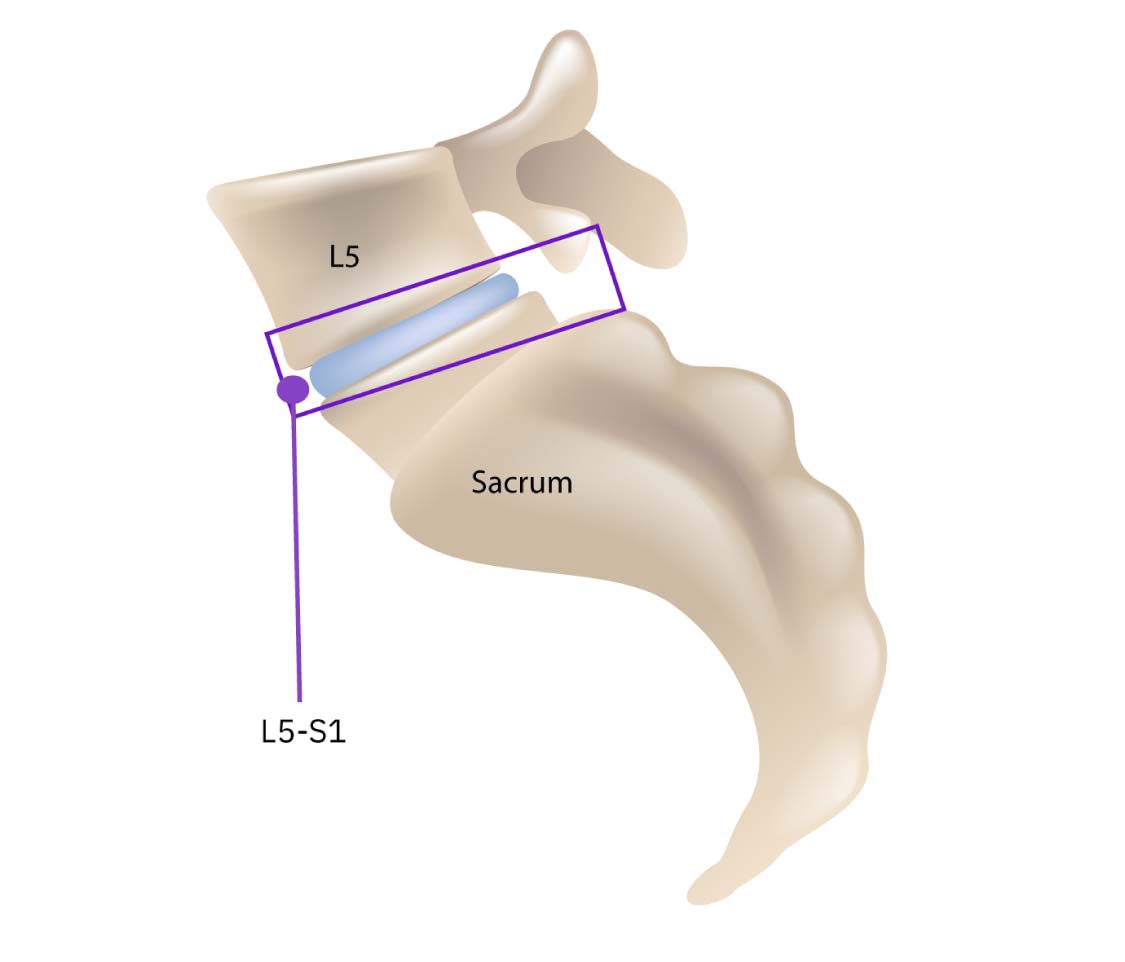
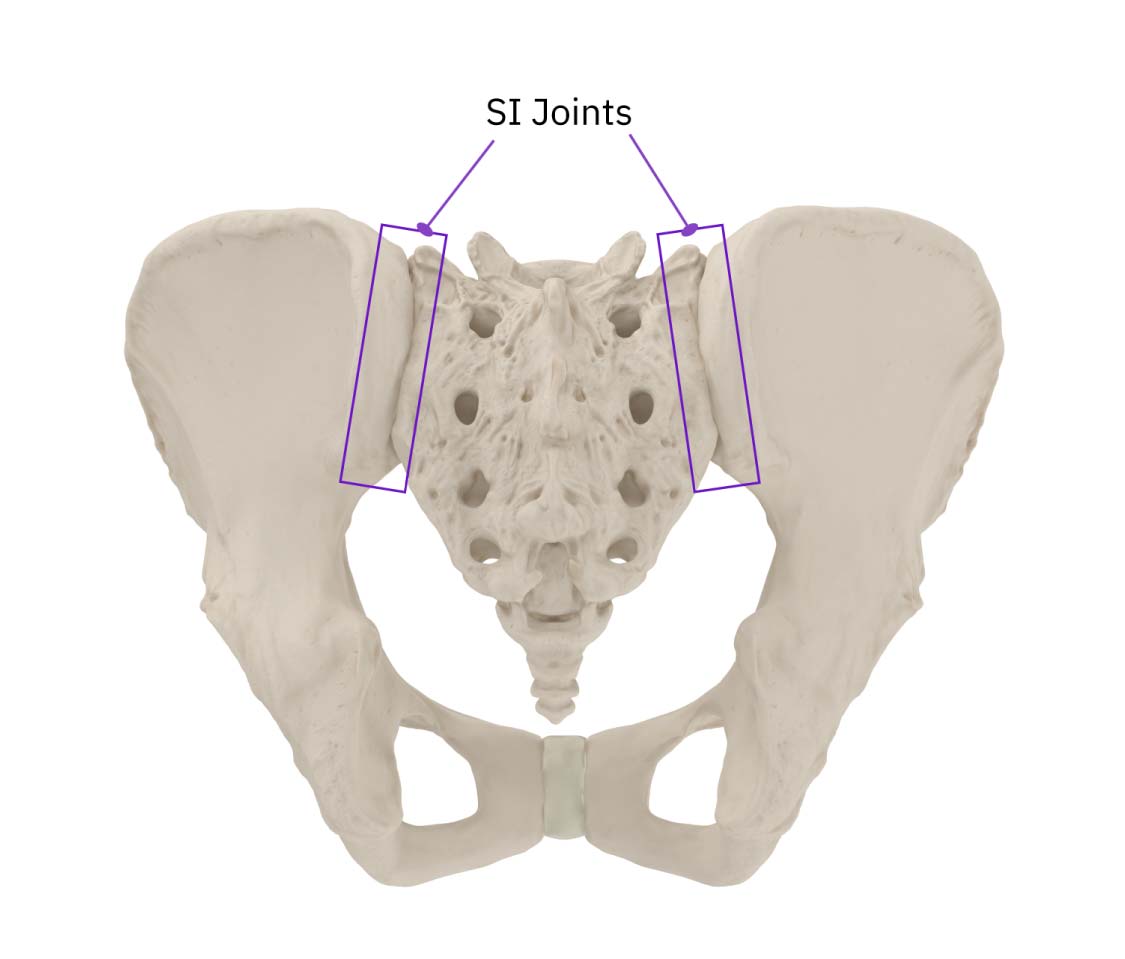
Your sacrum is sandwiched together on either side by your pelvic bones at a joint called your SI joint - short for sacroiliac joint.
Pelvic Bones
Your pelvic bones are technically made of 3 bones each, but they fuse together to form one bone after adolescence.
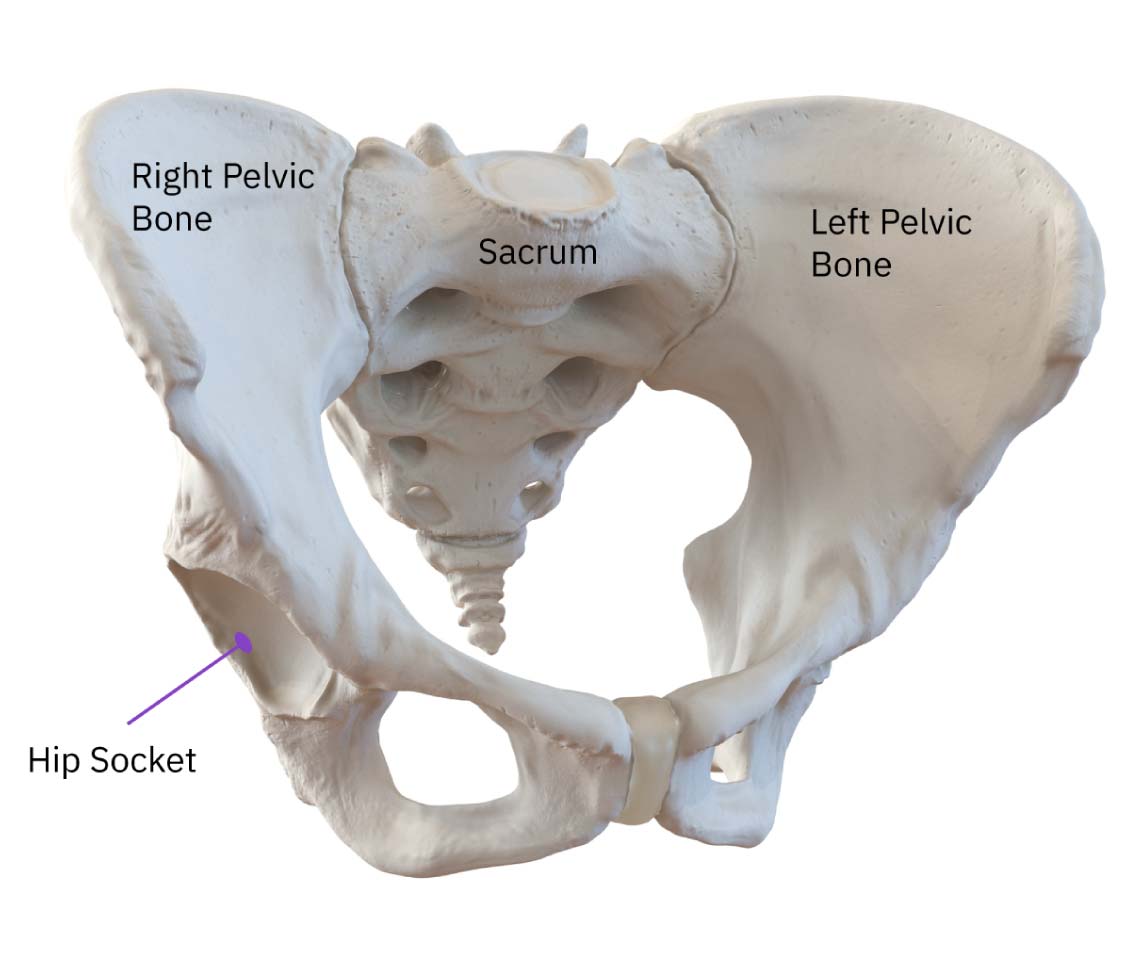
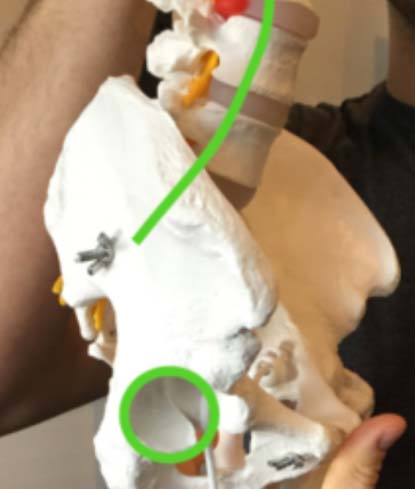
On the lower outside part of your pelvic bones there is a socket.
This is the socket of the hip joint.
This is the top half of your hip joint.
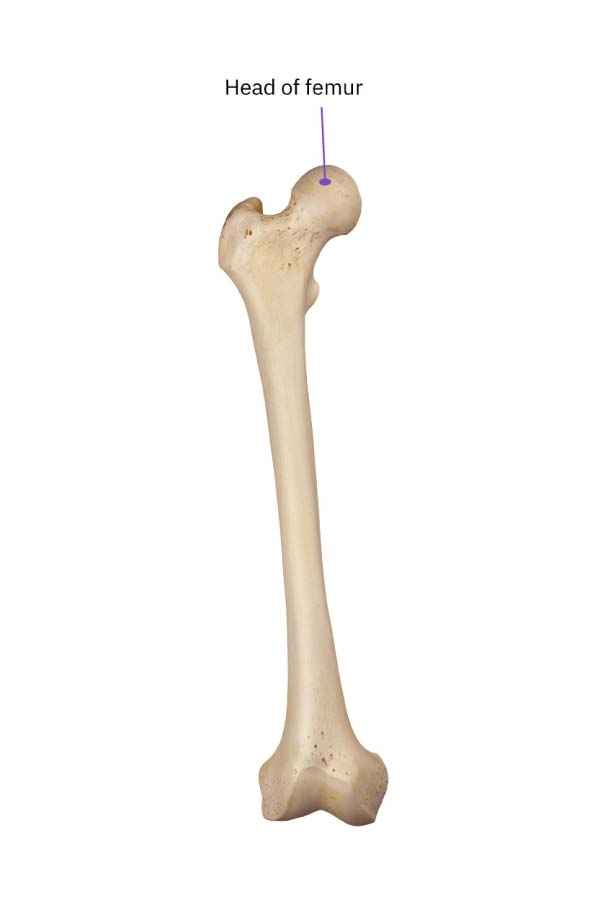
Femur
The bottom half of your hip joint is your femur, specifically what is called the head of the femur.
From the lumbar spine to the pelvis, to the hip, you have 10 bones:
- L1
- L2
- L3
- L4
- L5
- Sacrum
- Right pelvic bone
- Left pelvic bone
- Right femur
- Left femur
Now that we have a picture of the basic anatomy, let’s dive a little deeper, starting with the lumbar spine.
Deeper into the Lumbar Spine
Between each two lumbar spine vertebrae, you have 3 joints.
For example, between L1 and L2, you have 3 joints. Between L2 and L3, you have 3 joints.
The reason for this is there are different parts of your vertebrae that create joints with the vertebra above and the vertebra below.
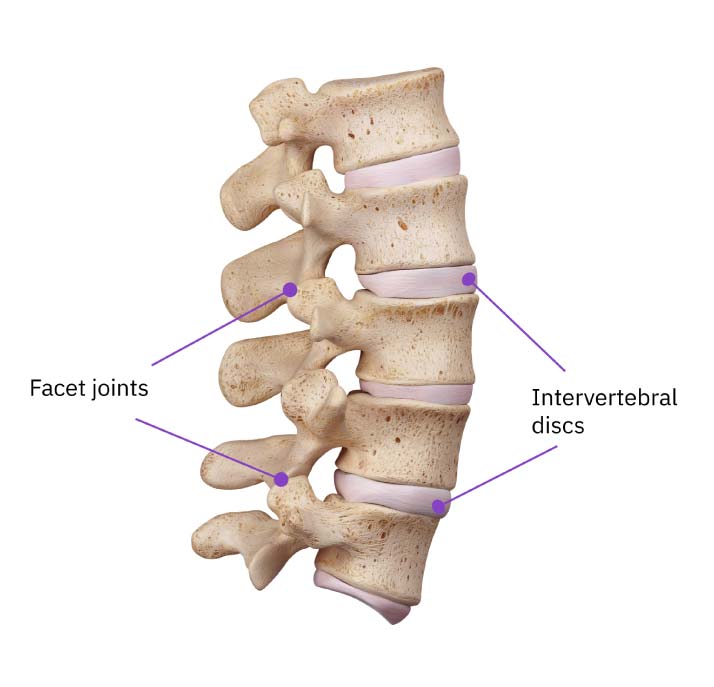
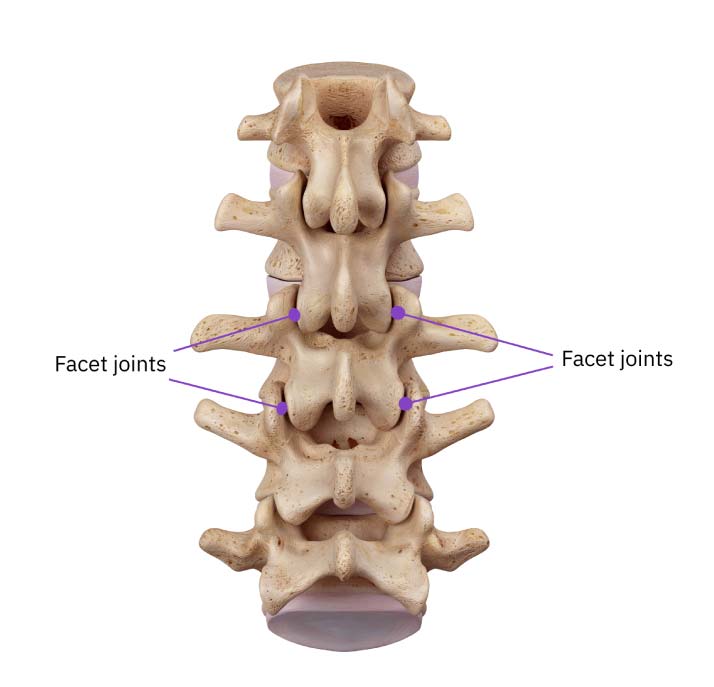
You have 1 joint between the vertebrae where the disc is, and 1 facet joint on the left and 1 facet joint on the right.
You can imagine how these joints may ultimately limit range of motion of the bones - you can only bend them so far in certain directions before the shape of the bones limits range of motion.
The lumbar spine, when measured across populations to try and define what is ‘normal’range of motion, gives us about these numbes for the different directions in which your lumbar spine can move:
- Flexion: 60 degrees
- Extension: 20 degrees
- Right and Left Side Bending: 15 degrees each side
- Right and Left Rotation: 3-15 degrees each direction
This gives you a general idea of what should be possible for your spine.
But remember, not every human body is built the same. There is variation from person to person and throughout a population.
The vast majority of the range of motion of the lumbar spine is in flexion and extension.
Let’s continue by discussing deeper about the SI joints.
Deeper into the SI Joints
The SI joint is often blamed for many problems. However, it’s important to note that in most people above 18 years old the SI joint is naturally fused. In some people, there may be a little bit of motion, but typically it’s 1-3 degrees, if any.
The SI joint is not a joint I focus attention on trying to affect. It may not even be possible anatomically to get it to move more, and even if you could, there is not benefit you will gain.
Let’s continue now by diving deeper in to the hip joint.
Deeper into the Hip Joint
The hip joint moves much more freely than the other joints we’ve discussed, due to the bony architecture.
It is literally a ball in a socket and can move in any direction.

Imagine how the architecture of the lumbar spine joints limits motion compared to the architecture of the hip joint.
The averages of hip joint motion are:
- Flexion: 110-130 degrees
- Extension: 15-30 degrees
- Abduction: 45 degrees
- Adduction: 20-30 degrees
- Internal Rotation: 40 degrees
- External Rotation: 45 degrees
Remember, these are averages.
The hip can vary a bit from person to person due to structural differences in the shape of the femur and the pelvis. Some estimates are 10% of a population has notable torsion of the femur.
Just be aware of this as a side note. Read this article for more information.
Can you see structurally how the bony shape of the hip allows for a certain range of motion that the lumbar spine does not?
The potential range of motion of a joint is determined ultimately by the structure of the joint, which is due to the shape of the bones since a joint is where two bones articulate.
With that said, the body is all connected. Movement of your lumbar spine will affect where in space your hip and ultimately foot can go, which has implications for how you perform certain exercises and drills. Let’s look in the next section how movement of the lumbar spine affects your hip joint.
How movement of the lumbar spine affects your hip joint
There is movement in the hip joint and then there is movement of the hip joint.
Let’s look at a series of images to understand how this all works together.
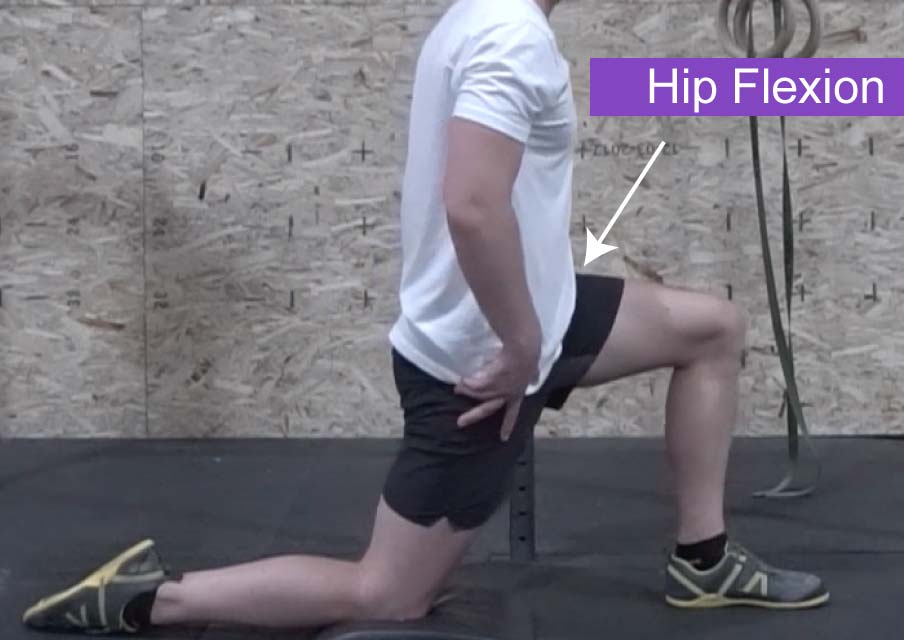
These first two photos show:
Photo 1: A neutral spine with a neutral hip
Photo 2: A neutral spine with a flexed hip
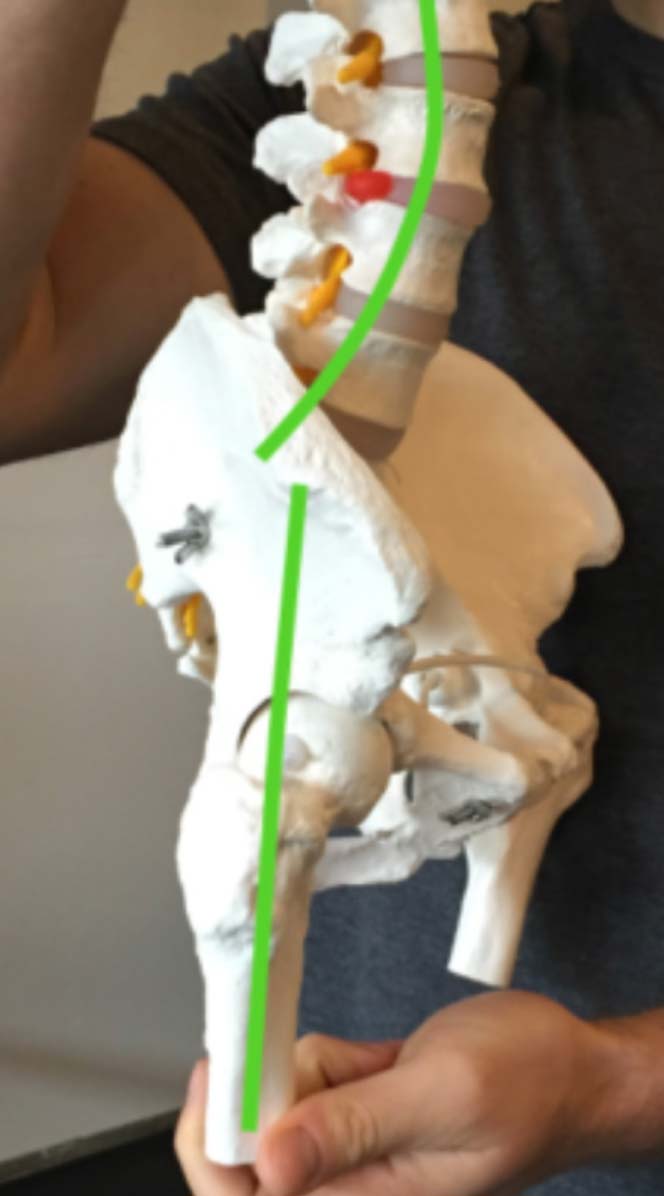
This demonstrates what motion looks like when it is just in the hip joint.
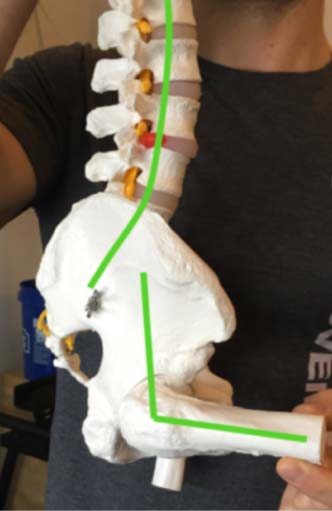
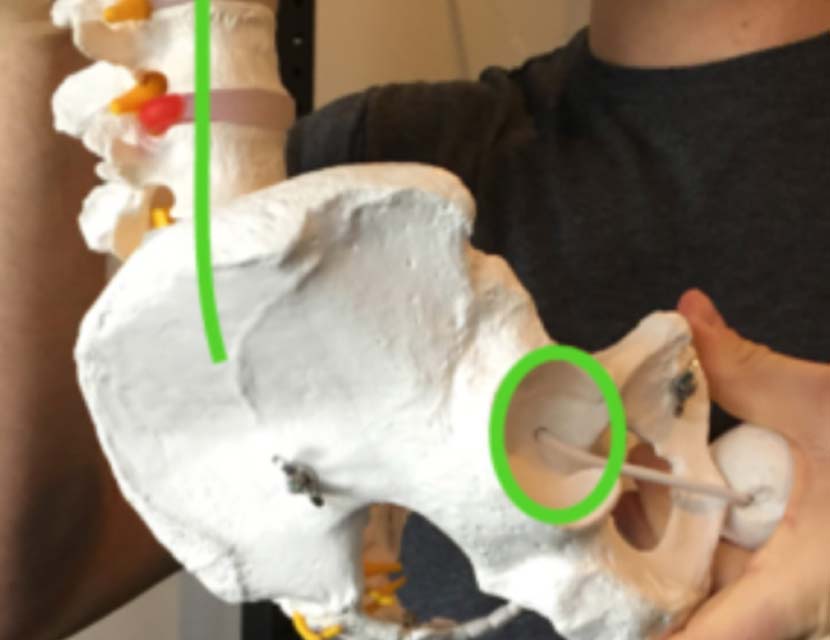
In these next two photos, we have:
Photo 1: A neutral spine with a flexed hip
Photo 2: A flexed spine with a flexed hip
You can see that the position of the femur in space is much different in the second photo than the first.
This is because of motion of the hip socket in space.
Since the hip socket is located on the pelvis, if the lumbar spine flexes, the pelvis moves in space and changes where the hip socket points.
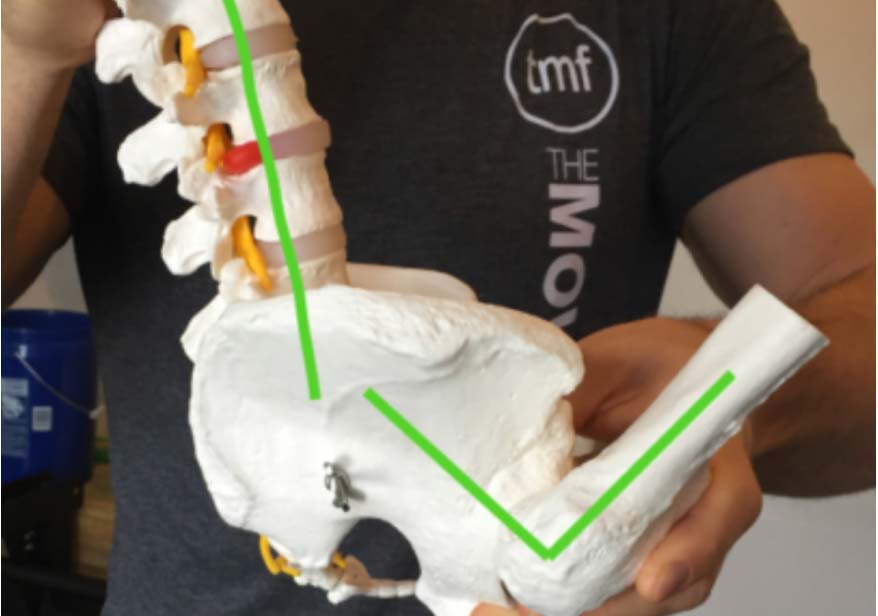
Look at these next two photos to better understand this:
Photo 1: Neutral spine
Photo 2: Flexed spine
Muscular Anatomy
The main reason it is important to understand muscular anatomy is:
- To know where to do tissue work
- To understand certain feelings you may have while training, such as muscular soreness, a muscle contracting, a stretch, etc
- To build a mind-muscle connection for better muscle activation or contraction
It’s way more important to understand the joints than the muscular anatomy and what you are trying to have happen at different joints. The muscles are secondary to achieving those positions most of the time.
As you go through this muscular anatomy section, make sure you basically understand it, but I suggest prioritizing the following over memorizing muscular anatomy:
- Joint anatomy and positions
- Proper execution of a variety of drills and stretches
- Consistently doing the actual work
With that said, let’s get in to the muscular anatomy.
The Muscles
Adductors
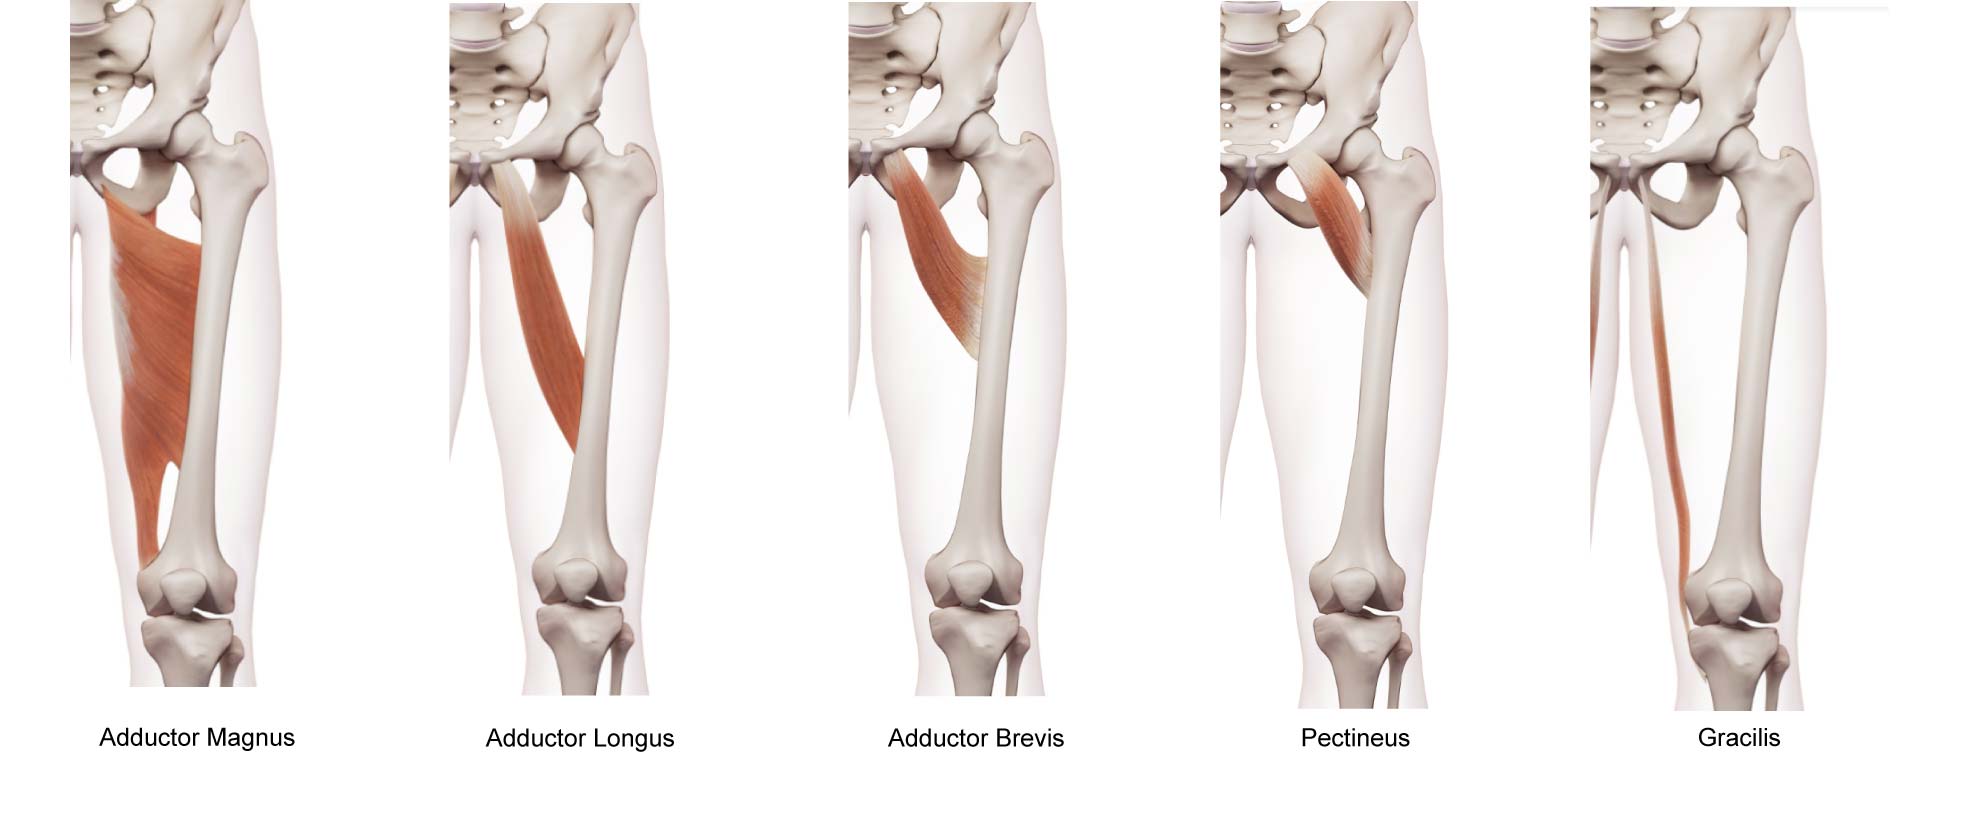
The adductor muscle group of the hip has 6 muscles.
The main action of this group of muscles is to adduct the hip.
However, when performing certain exercises, such as the squat, the adductors will do different things.
Think about the bottom of a squat, especially something with weight like a back squat.
The hip joint is in flexion and the lumbar spine is held neutral. Likely the hip joint is in a bit of abduction and external rotation.
When the bones are in this position relative to each other, contraction of some of the adductors will adduct the hip and extend the hip.
This is probably why if you’ve done a lot of squatting, you may have felt inner thigh soreness after a training session. The adductors are actively working in squatting.
The adductors attach from different parts of the pubic ramus and attach to the backside of the femur at different distances downward on a thickened line of bone called the linea aspera.
Because of their attachment to the pelvis on the pubic ramus, try and imagine in your mind’s eye how changing your lumbar spine and pelvic position will change the tension on the adductors during different stretches, exercises, or mobility drills.
For example, if you were to go into lumbar extension, that will rotate the pelvis anteriorly, which pulls the pubic bone backward, which would stretch some parts of the adductors.
Keep this idea in mind as you read through the details of each muscle and see if you can imagine how moving the pelvis or the femur would change the tension in the muscles and how hip mobility can be limited or controlled by this muscle group.
Adductor Magnus
The adductor magnus is a huge muscle that has two distinct parts.
One part attaches attaches to your pelvis at your pubic ramus and to the back of your femur along the linea aspera. This part of the adductor magnus acts similar to the other hip adductors.
The other part attaches from your pelvis on the ischial tuberosity (where your hamstrings attach) to a point just above your knee on the femur. This part of the muscle acts more like one of the hamstrings than an adductor.
Adductor Longus
The adductor longs attaches from the pubic ramus to the femur.
Adductor Brevis
The adductor brevis is similar to the longus, just shorter.
Adductor Minimus
The adductor minimus is like the brevis, just shorter. It is technically part of the adductor magnus.
Pectineus
The pectineus attaches from the front of your pubic bone down onto the inside of your femur.
Gracilis
The gracilis is a thin muscle that attaches from just lateral to your pubic symphysis joint down below the knee on your tibia.
It is the only muscle in the adductor group that crosses the knee joint.
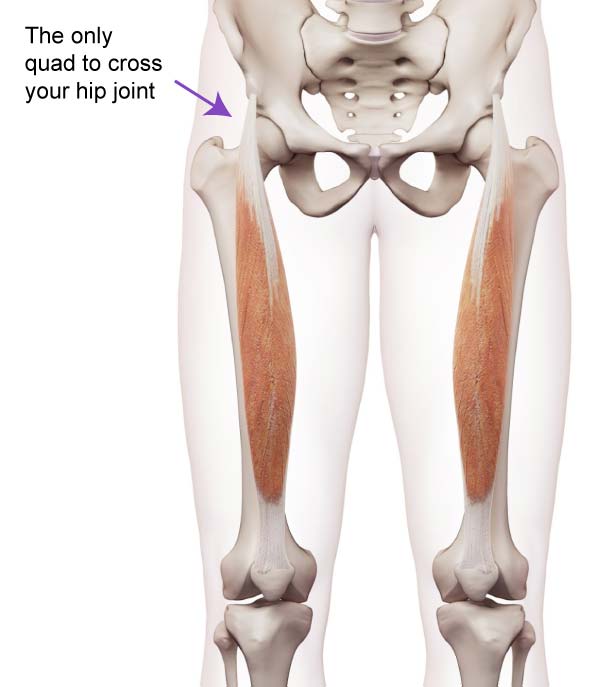
Quadriceps
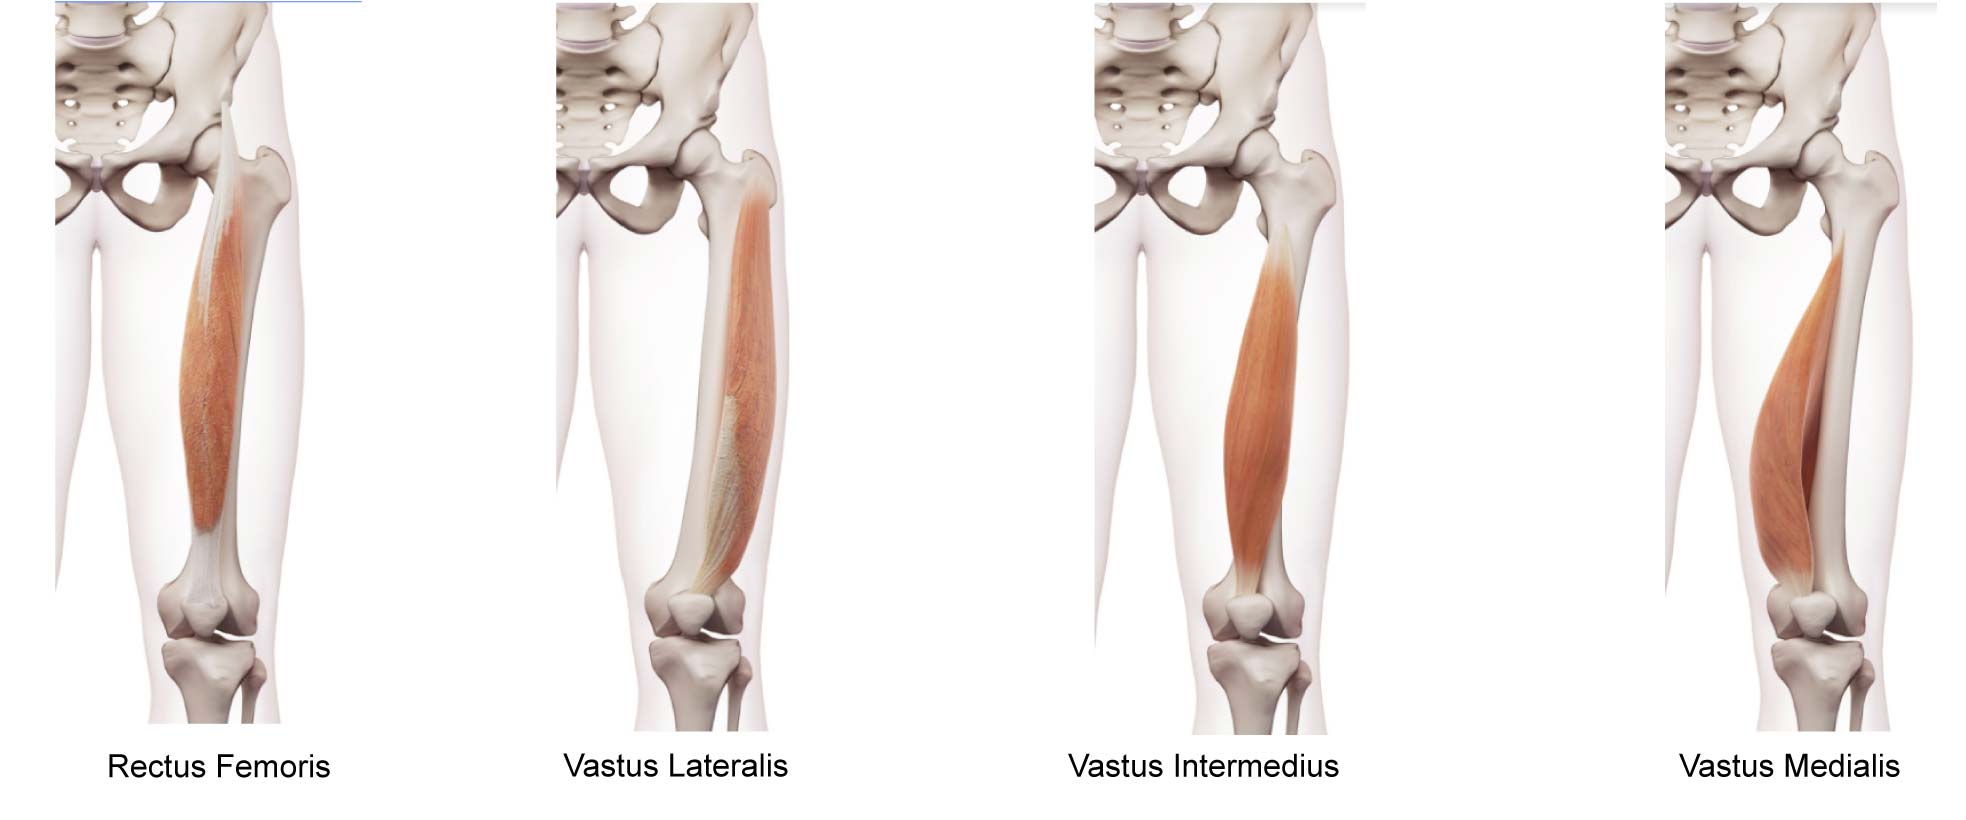
The quadricep muscles, as the name implies, consist of 4 muscles:
- Vastus medialis
- Vastus Lateralis
- Vastus Intermedius
- Rectus Femoris
Only one crosses the hip joint: the rectus femoris.
Since it attaches onto the pelvis and continues to become part of the patellar tendon, it has an effect on hip mobility.
Primarily the rectus femoris will limit hip extension and when concentrically contracted create hip flexion.
The attachment to the pelvis means lumbar spine and pelvic positioning are important when trying to stretch this muscle and work on hip extension.
If the lumbar spine is extended, the rectus femoris will not be most effectively stretched.
Keeping the lumbar spine neutral or slightly flexed will pull the muscular attachment upward and putting a more effective stretch on this muscle instead of compressing the joints of the lumbar spine.
Rectus Femoris
Vastus medialis/Vastus Lateralis/Vastus Intermedius
None of these muscles cross the hip joint, so they aren't a consideration in hip mobility.
Hamstrings
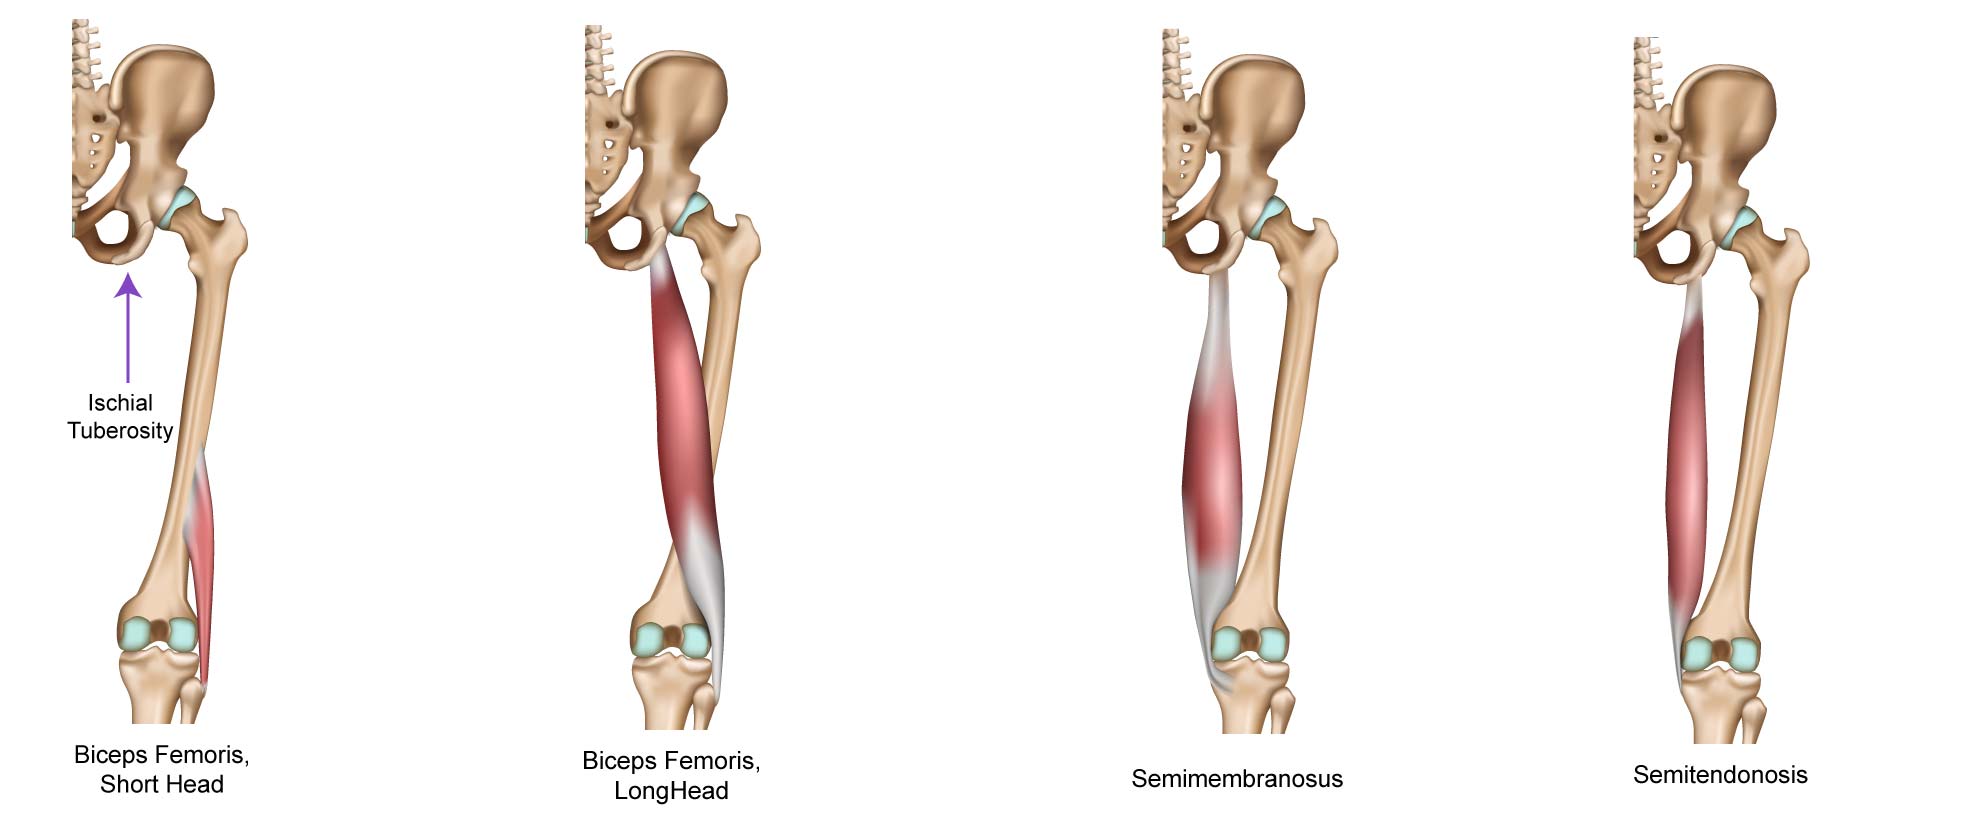
The hamstrings consist of 4 muscles:
- Semimembranosus
- Semitendonosis
- Biceps Femoris, Long Head
- Biceps Femoris, Short Head
3 of these muscles attach on the pelvis at the ischial tuberosity and then continue downward to attach below the knee.
The biceps femoris, short head, doesn’t cross the hip, only the knee.
The hamstrings can limit hip joint flexion, but usually only if the knees are straight.
If the knees bend, the hamstrings lose some tension and may not limit hip flexion, like in squatting. The hamstrings don't limit squatting because they're not being stretched when the knees are bent.
The biggest compensation during a hamstring stretch is rounding the lumbar spine.
When going into a forward bend, if the ischial tuberosities, the point where the hamstrings attach, can’t move upward, the pelvis will get held by the hamstring tension and the only way to go farther is to bend through the lumbar spine.
Gluteals
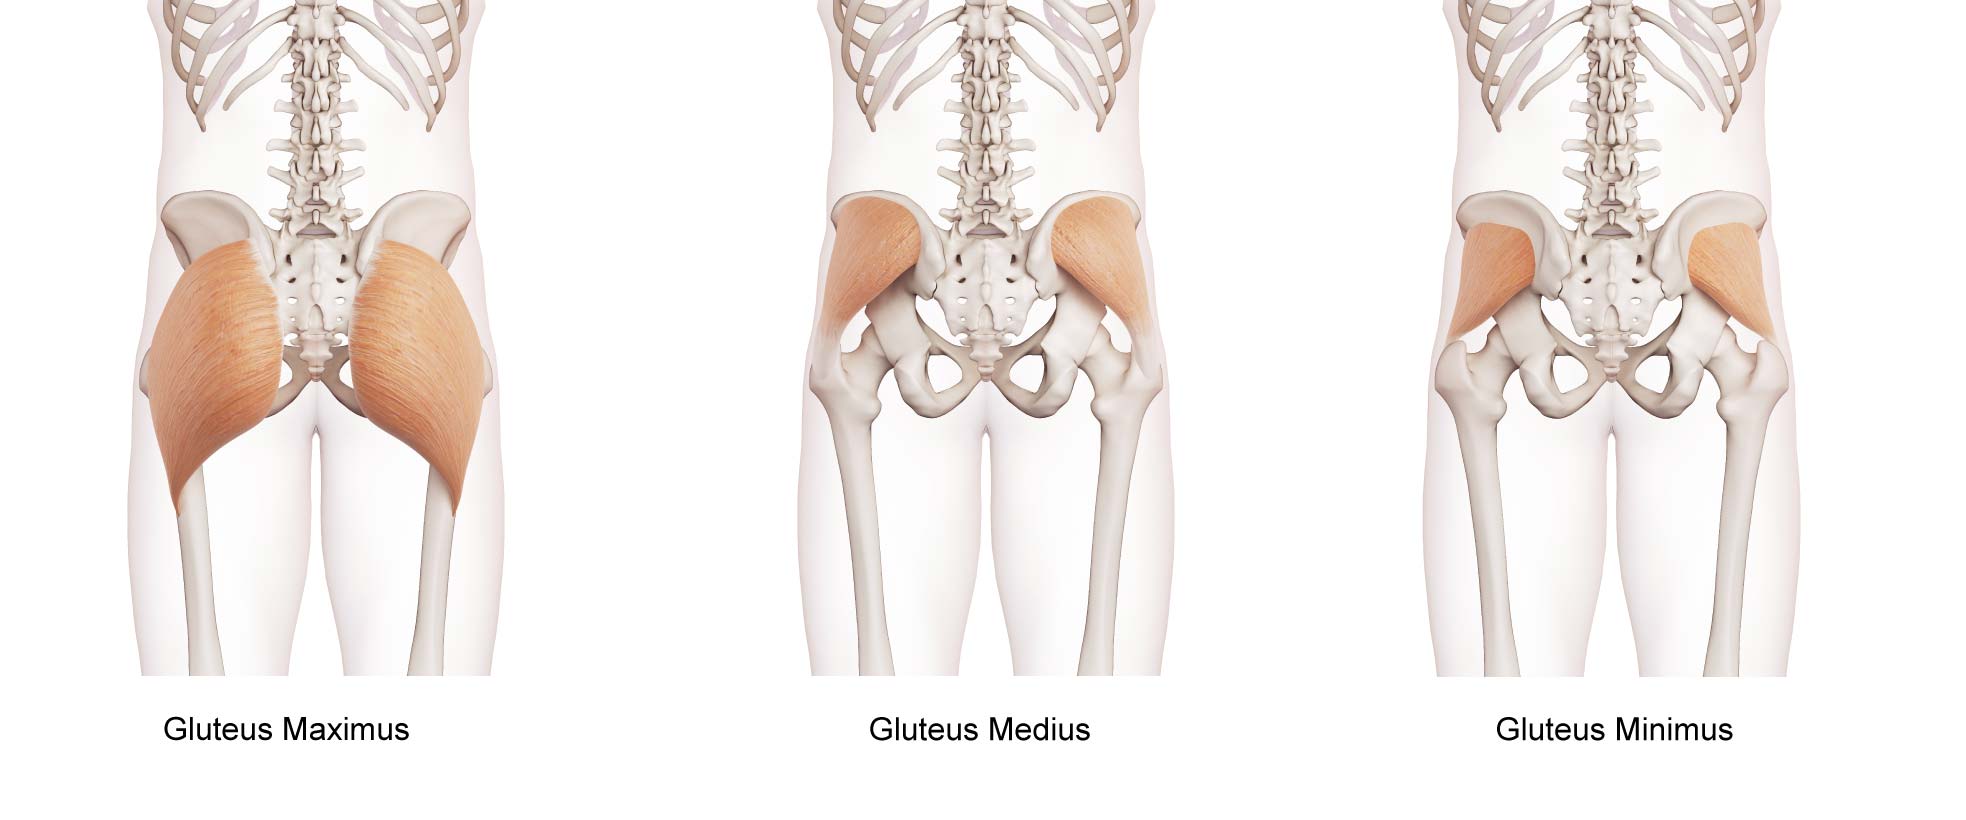
This group consists of 3 muscles:
- Gluteus Maximus
- Gluteus Medius
- Gluteus Minimus
The glute max is by far the largest.
It acts to primarily extend and externally rotate the hip joint.
The gluteus maximus would be most likely to limit hip flexion with adduction, like what you might see with a pigeon stretch.
The gluteus medius is not likely a muscle limiting your hip mobility in any way. Instead, it is a muscle to strengthen as it helps stabilize and control the position of your pelvis and hip joint.
The gluteus minimus is a small muscle on your pelvis, below your gluteus medius, and it is very unlikely preventing mobility in your hip. You will likely strengthen it anytime you are doing lower body exercises.
Deep Rotators
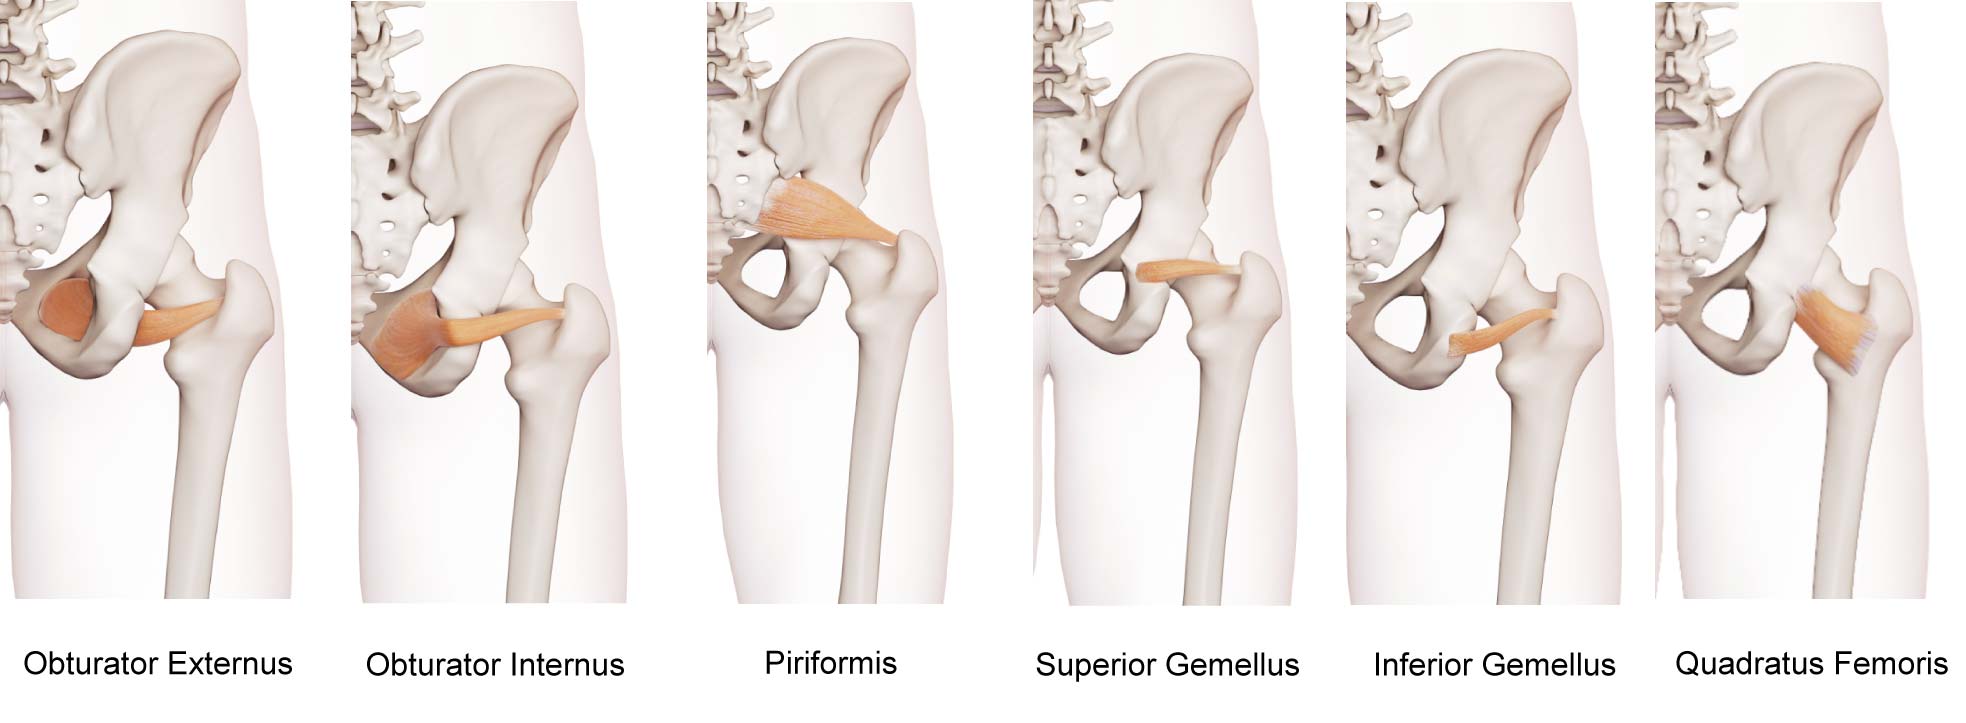
This group consists of 6 muscles:
- Piriformis
- Superior Gemellus
- Inferior Gemellus
- Obturator Externus
- Obturator Internus
- Quadratus Femoris
These are small muscles deep in your hip that help to guide and control hip motion.
They are not likely big muscles preventing you from achieving your hip mobility drills.
In my opinion, don’t bother thinking much about these muscles, and yes, including the piriformis.
The piriformis is, in my opinion, overly-blamed for causing hip and lower back problems.
If you do some of the gluteal and external rotation strengthening exercises demonstrated in later sections of this article, you will be doing the needed work on these muscles. Other than that, I don't think it's worth spending any brain power on remembering these muscles for 99.999% of people.
Hip Flexors
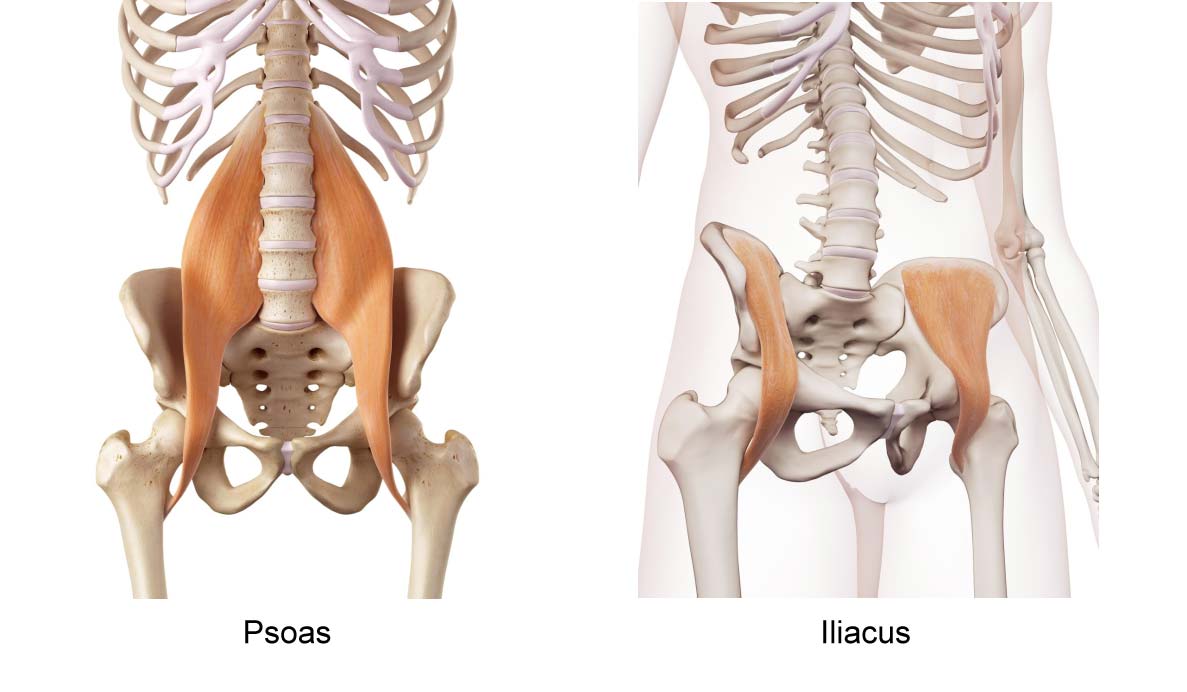
The two main muscles here are:
- Psoas
- Iliacus
The psoas attaches from your lumbar spine onto your femur. It flexes your hip when it contracts and it can limit hip mobility into extension
The iliacus attaches from the pelvis down onto the femur along with the psoas.
When it contracts, it will create hip flexion and it can limit hip extension.
These muscles are deep, especially the psoas, and working on them yourself can be challenging. Many of your organs and your intestines are in front of your psoas. To work your psoas you would have to work through these organs, which is not something I advise people to do themselves.
Technically, a few other muscles flex your hip joint, such as the rectus femoris and sartorius. Clasically the psoas and iliacus are considered the ‘hip flexor group’.
Muscles that sort of don't fit in another group
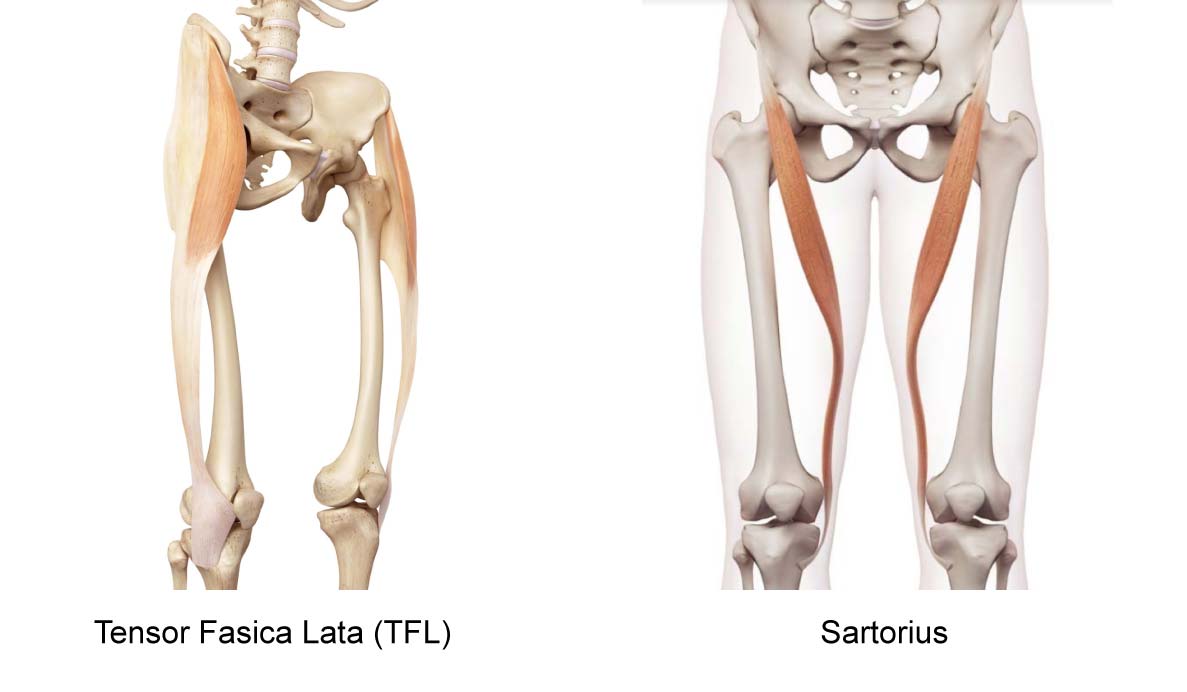
- The sartorius
- The tensor fasica lata (TFL)
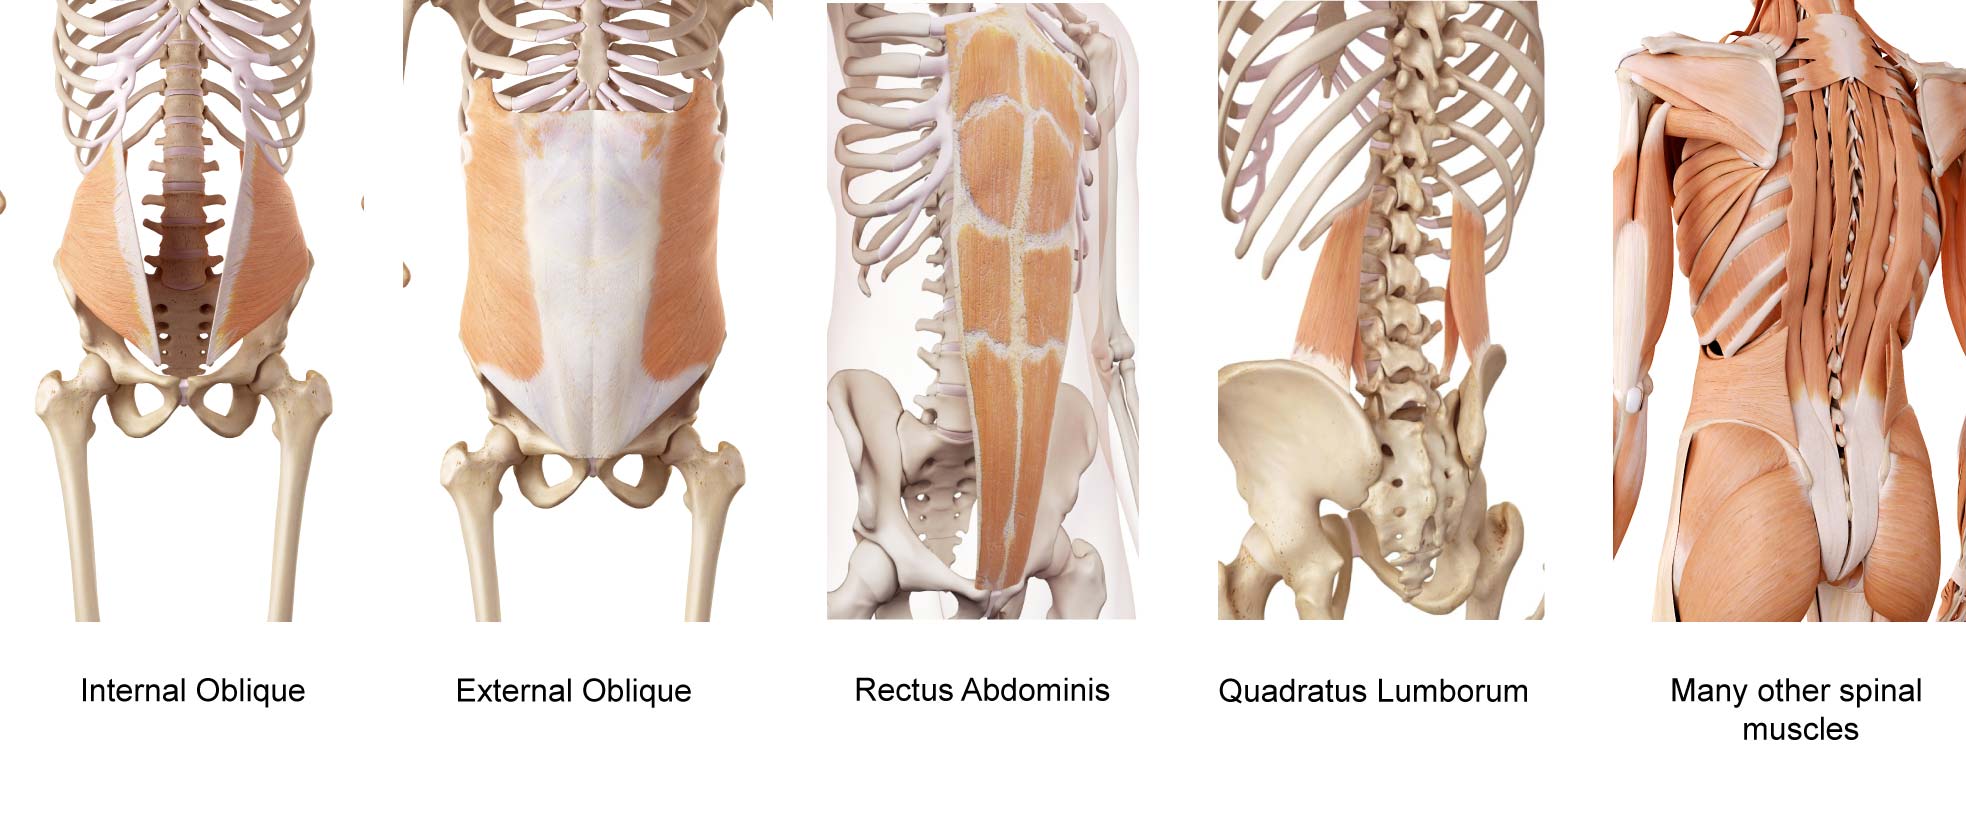
Spinal Muscles
Hip Ranges of Motion
The hip joint can move in many directions due to the structure being a ball and socket joint. This is one of the reasons having full hip mobility is important - it has freedom in so many directions.
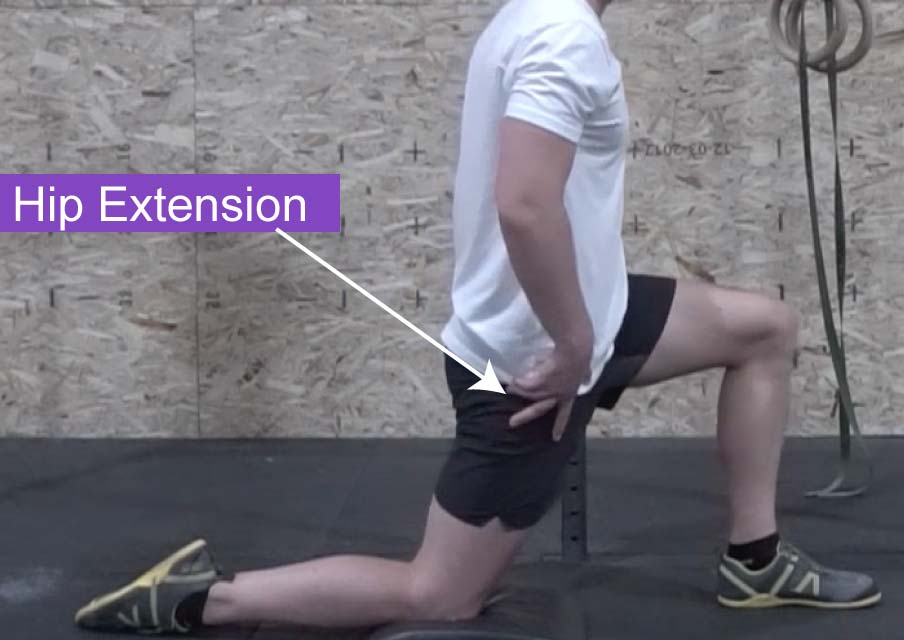
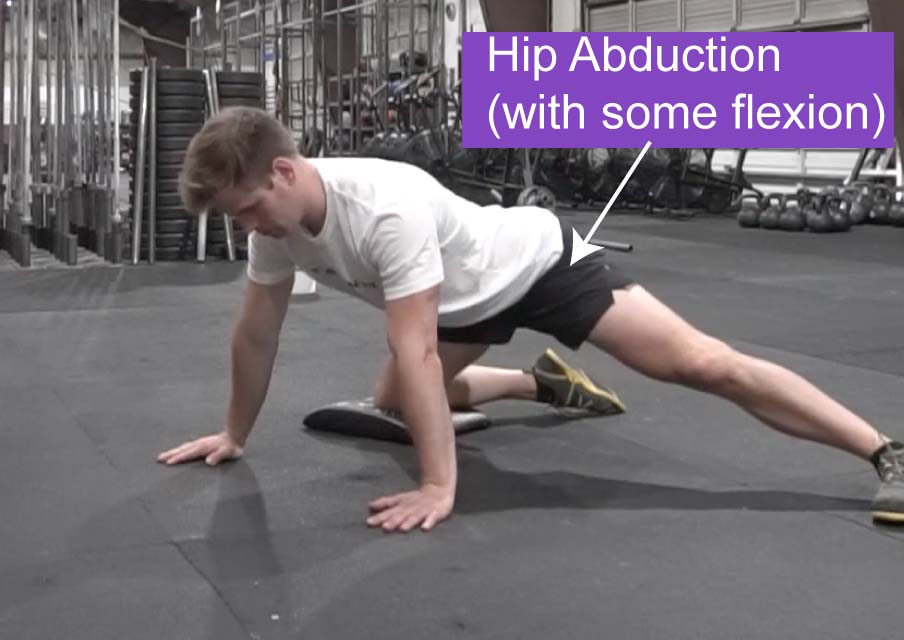
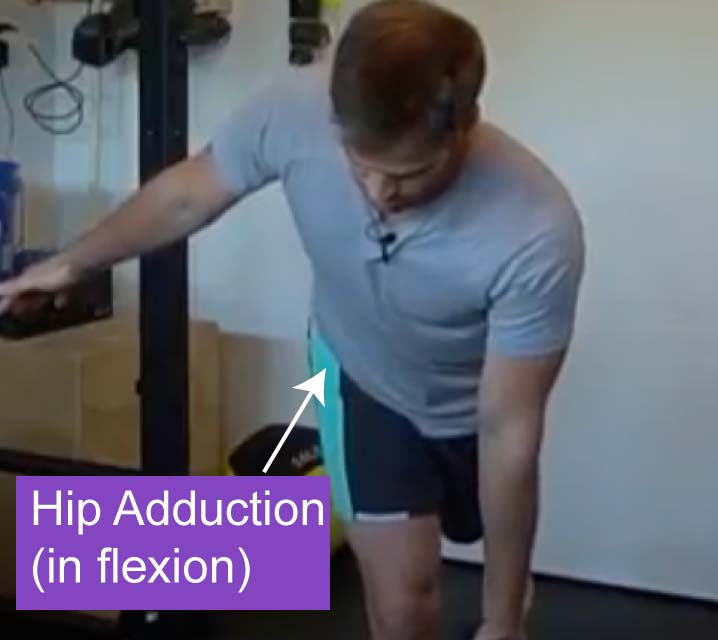
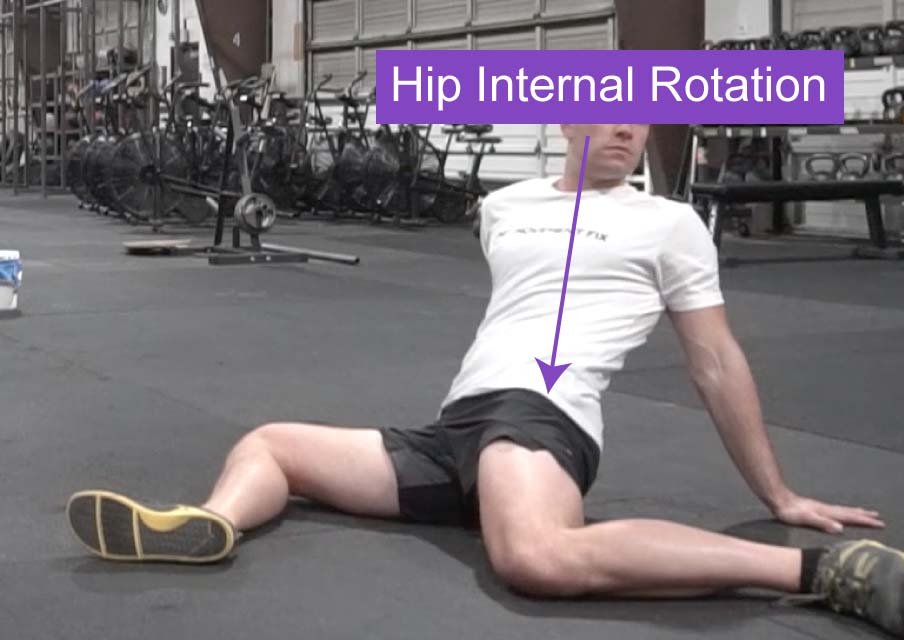
The motions it can go into are called:
- Flexion
- Extension
- Abduction
- Adduction
- Internal Rotation
- External Rotation
- Combinations of these different movements
All ranges of motion are important. Some may be used more, and in more total degrees, but they should all be worked on, actively used, and able to be controlled.
As a quick reference, here are the ‘standard’ ranges of motion for each direction:
Flexion: 110-130 degrees
Extension: 20-30 degrees
Abduction: 45
Adduction: 20-30 degrees
Internal Rotation: 40 degrees
External Rotation: 45 degrees
[Here is a nice reference for joint ranges of motion for quick reference]
It’s important to note that these are averages and there is known variation in the hip joint that will affect these ranges of motion.
In this article, we will speak about the hip joint that falls within the mean, but be aware that for most people who just want to work on their hip mobility, measuring degrees is less important than working on the range of motion.
Let’s dig in by discussing each range of motion.
Hip Joint Flexion
Hip flexion normally falls between 110 and 130 degrees among populations.
The common limitations to hip mobility into flexion are:
- Inability to stabilize the lumbar spine (this is a control issue where the lumbar spine would flex instead of the hip joint flexing)
- Adductor tightness (more common if you are in hip abduction and external rotation, as you may be in a toed out squat)
- Posterior chain tightness, such as the hamstrings or nerve tension (if the knees are held straight)
- Stiffness of the joint itself
- The structure of the joint is the ultimate limiter of hip flexion
Hip Joint Extension
- Muscular tightness of:
- Rectus femoris
- Psoas
- Iliacus
- Sartoruis
- Inability to prevent lumbar extension
- If you always extend your lumbar spine, you will extend the lumbar spine instead of extending the hip joint
- Ligament tension on the anterior hip
- This is likely the ultimate limiter of hip extension for most people
Hip Joint Abduction
- Tightness in the adductor muscles
- Inability to stabilize the lumbar spine
- A compensation would be side bending in the lumbar spine
- Bony structure of the joint
- If you were to work through all muscular tightness around this joint, you would limited in your abduction range of motion by the bones running in to each other
Hip Joint Adduction
This is not a common motion to be lacking. In fact, I have rarely seen someone that I thought needed better hip mobility into adduction.
The more common thing is for someone to have weak hip abductors and that causes them to adduct too much when they are running, jumping, walking, etc.
The ultimate limiter of hip abduction would likely be the structure of the joint, but I think this is rare for people to even try this and have issues with hip adduction as a limited range of motion.
Hip Joint Internal Rotation
Rotation of the hip joint, both internal and external, can be varied a bit depending on the version of the femur. Our article on hip variations and squatting goes more into depth on this topic.
Hip internal rotation is an interesting range of motion to work on.
If someone had a pinchy hip joint, such as they squat and feel pinching in the front, a common orthopedic test is to flex the hip joint and internally rotate it and see if the pinching can be recreated.
The reason this test is done is because those combined motions, hip flexion and internal rotation, mechanically impinge the joint.
Impingement isn’t bad, just like standing on your feet compresses your feet and that is not bad. However, too much of anything can be a problem.
Many people work on their hip internal rotation range of motion and find squatting and other motions feel good.
The main limiters of hip mobility into internal rotation can be:
- The bony structure of the joint
- Stiffness of the joint in this motion from not using it often - this may be due to non-muscular soft tissue tightness, such as the capsule - I have found this impossible to prove to myself whether this is actually what’s happening or not
- Stiffness of the hip external rotators holding tone
It’s important to note that for many people, but more often than not women since they tend to be more anteverted at the hip joint, it’s possible to have too much hip internal rotation, or perhaps better stated, it’s a little too easy to get into a lot of hip internal rotation.
Why does this matter?
When doing running, jumping, cutting, squatting, or other activities, if the hip joint architecture is such that it’s easy to ‘fall in’ to hip internal rotation, there will be poor alignment of the knee and potential for knee injury.
Hip Joint External Rotation
Commonly hip joint external rotation is stretched while also in flexion, such as a pigeon pose stretch.
These two motions tend to go together: hip joint flexion and external rotation.
That is why when you squat your feet turn out a little bit (depending on hip joint structure).
The common limitations to hip mobility into external rotation include:
- The bony structure of the hip joint
- The hip internal rotators
- Your own understanding of how to access the range of motion
If you want to get as deep as possible into hip joint flexion, or brining your knee up to your chest, you will likely need some hip joint external rotation.
The amount of hip joint external rotation that you need to achieve maximal hip joint flexion is completely dependent on the structure of your hip joints.
The majority of people fall within a close proximity to each other. With roughly 10-20 degrees of external rotation, they will achieve maximal hip joint flexion.
If someone is retroverted, they will need more external rotation to achieve maximal hip flexion. If someone is more anteverted, they will not need nearly as much since it is essentially ‘made up for’ by the structure of the joint.
Hip Mobility Drills
Now that you understand the anatomy of the hip, the muscles around the hip joint, what limits range of motion, and what common methods are for improving hip mobility, we can look at the specific things you can do to improve your hip mobility.
In this section, drills are broken down by the direction of mobility you are trying to increase and the muscles that limit that range.
We will cover:
- Hip extension and the quads/hip flexors
- Hip abduction and the adductors
- Hip external rotation and glutes
- Hip internal rotation
- Hip flexion, posterior chain, adductors
Hip Extension
Here is a video instructing how to perform this:
To stretch the quadriceps, you may want to use the rocking quad stretch as demonstrated below:
To actively work on your hip extension, try using a rear foot elevated split squat. This can be performed for reps, contract relax, or relaxing in to the stretch:
Drill 1: Rocking Quad Stretch
- Put a pad or similar under your kneecap
- Try not to arch backward through the lower back
Drill 2: Kneeling Hip Flexor Stretch
- Put a pad or similar under your kneecap
- Try not to arch backward through the lower back
Drill 3: Rear Foot Elevated Split Squat
- Hook the front of your ankle on the bench for a solid connection to the bench
- Try not to arch your lower back as you get into the depth of the movement
- Go slow and try to work a large range of motion
- Try to touch your back leg heel to your butt
Hip Abduction and the Adductors
Here is a video instructing how to do this:
To stretch the adductors, you may want to start with something like a rock back adductor stretch:
To work on them from standing, you may want to work on a single leg standing rock back:
To work on them more aggressively, you may want to use a wide-stance RDL:
Drill 1: Rockback Adductor Stretch
- There should be no pinching in your hips. If there is, try externally rotating the pinchy side hip
- Try and keep your lumbar spine in neutral. Since the adductors attach to the pubic ramus, if your lumbar spine flexes the adductors go off tension
Drill 2: Single Leg Straddle Stretch
- A lower height is easier. Begin at the level that you can do this drill with some ease
- Try and keep your lower back neutral (prevent it from bending)
- When you bend forward, think. about bending forward from your waist and sticking your butt out behind you
Drill 3: Standing Straddle Stretch
- Use a bench under you or have something to hold on to
- Record a video of yourself doing this to make sure you aren’t bending through your lower back like 99% of people do
Hip External Rotation and the Glutes
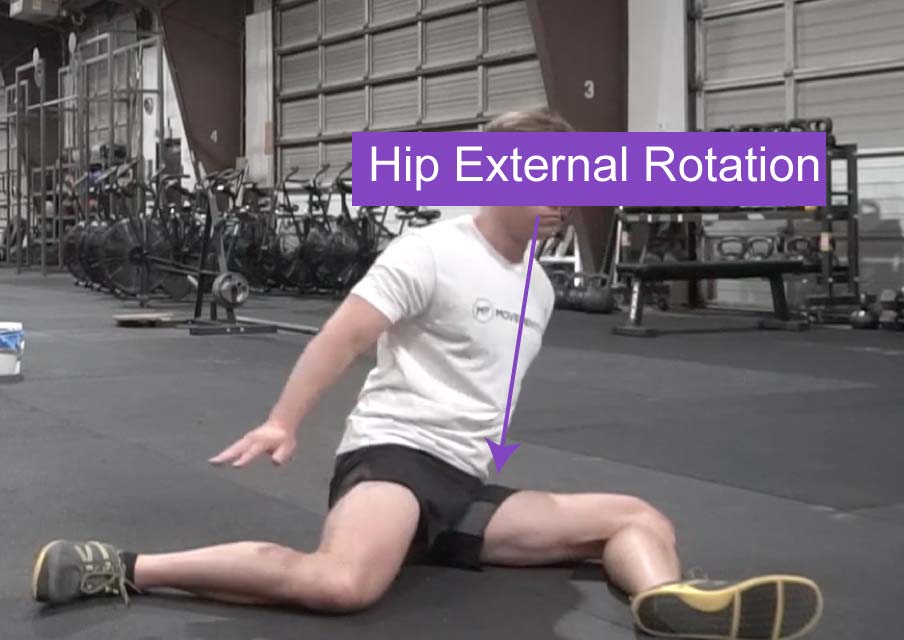
To work on this range of motion actively, you may want to use the 90/90 hip stretch, with a focus on moving over the front shin:
To build this range of motion, you may want to consider actively working through this range of motion like this:
Drill 1: 90/90 Hip Stretch
- This shouldn’t feel pinchy
- Put some weights or a chair near you for external support if needed
Drill 2: 90/90 Hip Stretch to Kneeling
- Adjust the amount your knees are bent to make the kneeling part easier. You may need to bend the front knee quite a bit
Drill 3: Banded Clamshell
- Support your head and neck with your hand
- Push your lower side knee down into the ground
- Try not to rotate through your lower back
Drill 4: Side Plank Banded Clamshell
- Make sure to keep your head and neck aligned and in neutral (its easy to tilt your head to the side during this)
- Push the bottom leg into the ground with intention
- Try not to rotate your torso
Hip Internal Rotation and Adduction
For working hip internal rotation, the best place to start is using the 90/90 hip stretch and focusing on the rotation toward the back leg, as demonstrated in this video:
Drill 1: 90/90 Hip Stretch
- Put a put under your knee if this drill is not comfortable
- Place a chair or something close to you for external support if needed
Drill 2: Hinge to Hip Airplane
- It’s easy to rotate through your low back during this. Intend on getting the motion through your hip
- Use external support if balance is an issue
Drill 3: Closed Chain Hip Circles
- Use external support if needed
- Try to make as big of circles as possible
- Try to wean yourself off external support as you improve
Hip Flexion, Posterior Chain, and Adductors
When the knee is straight, the hamstrings and posterior tissues (like nerves) may be the limiter.
In that case, you may want to roll out the hamstrings as shown here:
Then you may want to do some straight leg raises:
Then you may want to do some control drills, like a banded pull through:
You may also want to use a drill to work on one leg at a time, in which case you can use a single leg deadlift:
If this is too challenging, you can try doing a single leg deadlift but with no weight and instead using external support, as demonstrated here:
If you are looking to improve your hip flexion for squatting, you will likely want to address the adductors, especially if you need to have a little bit more of a toed out or wide stance.
To work on that, you may want to foam roll the adductors, as demonstrated here:
You may want to use the rocking adductor stretch:
You may want to actively use your range of motion using a lateral lunge stretch:
Drill 1: Straight Leg Raise
- It may help to put your lumbar spine into a bit of flexion and then hold that position for the duration of the drill
Drill 2: Banded Pull Through
- When bending forward, as your chest drops push your butt back
Drill 3: Primal Pull Through
- Push your hands in to the ground and pull your chest through
- Keep knees locked and feet flat
Drill 4: Single Leg Hinge
- Use assistance if needed
- Only go as deep as you can recover from
How to Take Action to Improve your Hip Mobility
Above you have a ton of stretches and movements to do to improve your hip mobility, and it may be overwhelming and difficult to know where and how to start.
Remember, there is no perfectly correct way to do this, as much as we would all love that.
Here is how I often approach working on mobility:
1. Foam roll the muscle group for 15 seconds (optional)
2. Perform 5-15 reps of a stretch/movement that feels ‘easy’ that you can move through relaxed (this is usually more passive)
3. Perform 5-15 reps of a stretch/movement that is more challenging that you feel you have to actively work through (this is more active and loaded)
4. Repeat this cycle for 10-15 minutes
Need help with your lower back and hip mobility?
Follow our program, which will show you exactly what to do and how

Need help with your lower back and hip mobility?
Follow our program, which will show you exactly what to do and how
What to Read Next
Top 5 Exercises to Work On Your Hip Extension
Top 5 Exercises to Work On Your Hip ExtensionIntroductionIn this article, we will cover: What hip extension is The difference between global extension and hip extension The muscles that control the pelvis and the muscles being stretched when the hip joint is more...
Why Your Lower Back Hurts When Sitting and What to Do About It
Why Your Lower Back Hurts When Sitting and What to Do About ItIntroductionThere are a handful of reasons why your lower back may hurt while sitting, so it’s impossible for an article on the internet such as this to explain to you exactly why your back hurts, but since...
Commonly Misunderstood Words in Movement and Mobility
Commonly Misunderstood Words in Movement and Mobility In this post I will be sharing my thoughts on common words used in the movement and fitness world with a focus on how to better define them conceptually, and where applicable, mathematically. Each day...
Comments
Excited to try these exercises! I have an old lower back/glute/hip flexor injury from deadlifting and have some arthritis in my hips and am finally getting back into CrossFit, but don’t want to hurt myself this time.
[…] If you want more ideas for how to work on your hip and low back mobility, you may enjoy our Ultimate Hip Mobility Article. […]