
How to Stretch Your Adductors with the Adductor Rock Back
How to Perform the Adductor Rock Back
Need more hip and low back mobility? Start with Day 1 of our Hip/Low Back Mobility Program for free:
The Setup

To perform the adductor rock back stretch correctly, you need to nail the set up position.
Place a pillow or pad on the ground for your knee. Put your knee on it and place your hands on the ground 1-2 feet in front of your knee.
The foot on your bent knee side should be inside of your knee so that your hip is externally rotated.
Your other leg, the straight leg, should be extended out to the side. You can keep that foot flat on the ground or rotate your toes upward.
Get your lower back flat, into neutral. You are now in the starting position.
How to Perform the Adductor Rock Back

Once you are in the starting position as described in the set up, you are ready to begin.
From the starting position, push your butt backward toward your heels.
It is important while you’re doing this stretch to keep your back flat.
Since the adductors attach to your pelvis, rounding your back will prevent you from most effectively stretching your adductors.

The finishing position should look identical to the starting position, except you are deeper into hip flexion.
The low back should have the same curvature.
Note that the chest does not drop down toward the ground. That is a common mistake.
Your torso should go backward toward your heels, not down toward the ground.
Ways to Use this Stretch
Typically there are three ways we like to recommend stretches be done (in no order):
- As reps
- As a relaxation technique (relaxing and breathing deeply into the stretch
- As a contract/relax nervous system technique
All of these are techniques are fine to use for this stretch as long as there is no pain.
There should never be pain or pinching with this stretch.
Common Errors to Avoid
Common Error #1 - Rounding the back
One of the most important things when doing this drill is to keep your back flat. This helps to get the most out of this stretch.


Common Error #2 - Incorrect hip positioning on the bent knee side
The foot on your bent knee side should be inside of your knee. That will put that hip into external rotation.
If the foot is outside of your knee, your hip will be in internal rotation, leading to the stretch ending because of that hip instead of the adductors on the straight leg.


Other posts you might like
Want more help with your hips? Check out these posts:
Need more hip and low back mobility? Start with Day 1 of our Hip/Low Back Mobility Program for free:
What to Read Next
Commonly Misunderstood Words in Movement and Mobility
Commonly Misunderstood Words in Movement and Mobility In this post I will be sharing my thoughts on common words used in the movement and fitness world with a focus on how to better define them conceptually, and where applicable, mathematically. Each day...
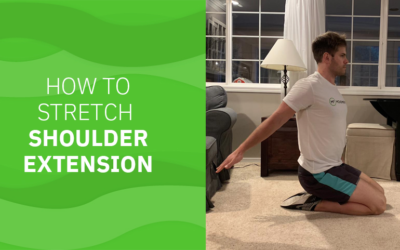
How to Stretch Shoulder Extension
How to Stretch Shoulder Extension Learn how to stretch your shoulder extension Want better shoulder mobility? Download Day 1 of our Shoulder Mobility Program for free: Option 1 For many people, option 1 will be the best option, especially if...
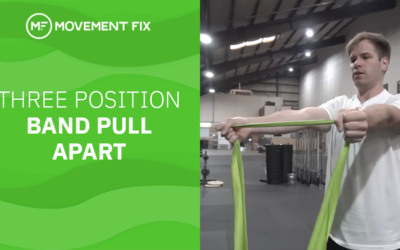
Three Position Band Pull Apart
Learn how to correctly perform the 3 position band pull apart to improve your shoulder and upper back strength and mobility
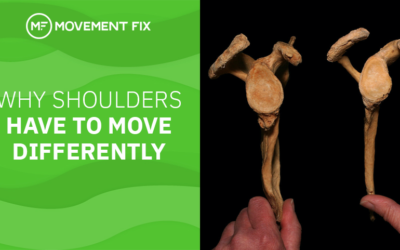
Why Shoulders HAVE to Move Differently
All shoulders have to move differently and stretching won't fix every problem. Learn how the anatomy affects overhead lifting.
Get all our latest articles sent directly to your inbox

Comments
[…] Stretch your Adductors with the rockback stretch […]